December 31, 2011

BLING BLAO!

I LOVE BEDAZZLING!

These are my NEW YEARS EVE NAIL$$$! I wanted to bling out my nails, one, because of it being a night of celebration and two, because i'll either be wearing a LBD or something sequined... decisions, decisions. :) Just like I find it difficult to NOT have crazy embellished and busy nails, I also prefer to have two different (or similar in theme, but not in image or design) designs on either hand. The left hand is more simple, it uses more stones, and was inspired by new age, ICY bling. While my right hand has a more antiquated feel, both in color and the mass amount of nail art beads creating a filigree effect.
Even though i have my BFA in jewelry and metalsmithing I really don't wear a lot of jewelry... So i typically leave it to my nails to bring in that flash... and this manicure delivers!


On my left hand (gold) I used O.P.I. - bling dynasty, 3 coats, and on the right hand I used Love & Beauty - coral, 2-3 coats,with a ring around the nails edge using Kiss - gold glitter striper. I then embellished with gold nail art beads which created filigree and "settings" for my white rhinestone cabochons. I then used 2-3 really thick layers of Seche VITE - fast dry top coat because I'll be busy all day tomorrow with my NYE so I had to do my nails the night before and its important that my nails last the night!

I hope you all have a fantastic NEW YEARS EVE and DAY!!!

December 30, 2011

Swatch! O.P.I. - funky dunky!

This is my very first swatch! I always have a really hard time being satisfied with solid colored nails, especially with my embellishment addiction :) However I am working to properly catalogue all my polishes since it seems to me amassing quite rapidly!

Starting NOW you will be able to view swatches of my nail polish by clicking on the polish title on my swatch page! i.e. scroll to the PURPLE section and then click O.P.I. - funky dunky which will redirect you to this post! Now as i said this is my very first swatch so it stands alone in the list, but SOON i will have more!


O.P.I. - funky dunky is from the Shrek Forever After collection! It is a beautiful purple that is very appropriate for the "toon" theme, because it looks so playful and... well, cartoon-like. After the first coat it appears sort of sheer, but as it dries and spreads it become more opaque. This manicure was done with 2-3 applications topped with Seche Vite - fast dry top coat to seal that beautiful O.P.I. shine in! (I used the usual O.P.I. bases, as always.)

This is my first time using this polish because my sister just got it for me as christmas polish haul, and i have to say, thank you! and I love it!

December 29, 2011

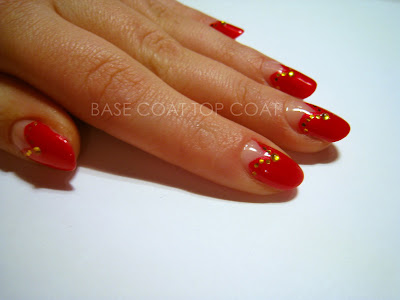
Heart

I love the V-GAP  whether it cuts down the center or it creates the sweet heart shape, I think it is so sexy!
the negative space created by the cleavage shape is appealing on the nails , i think mainly do to its suggestive directionality. It really elongates your nails, and well like most things that have that same shape... like... toes... in sexy pumps, it draws you in and creates a contrasting soft but fierce shape.
I added embellishments around the crown of the "V" to accentuate that shape.


After O.P.I. - natural nail strengthener, and O.P.I. -natural base coat (1 coat each) I then applied three coats of Sally Hansen - shell we dance (#160). After those completely dried I used O.P.I. - deer valley spice, for the first time, 2-3 coats, which is a really pretty pinkish red that is really luminous. 

Depending on the light the polish appears more pink or red.

I then added small hexagonal glitters about 6 -10 depending on the finger and at the tip of the gold glitter "V" I added a small gold rhinestone cabochon. I then sealed the design with Seche Vite - dry fast top coat.

I'm really happy with the design and I think its really elegant but still playful so i'll probably be using this heart shaped cleavage design for NYE!


Review

Review on Martha Stewart Halloween Glitter/Glue 6pk.


So I bought these glitters actually in August of this past year, and have become obsessed with her glitters ever since!
Now as you probably know her glitters are priced on the higher range of craft glitter, but let me tell you, THEY ARE WORTH IT!

The quality of the glitter is outstanding, and if you love glitter as much as i do her colors are DELICIOUS and her packaging i super clean too!
 This pack of glitter comes in black, silver, red, green, blue and orange, colors which are perfect for the halloween/fall season.
They are super fine and loose so the glitter never gets sticky and clump together.
Perfect for a light dusting as well as creating a super metallic surface that goes on smooth and clean no matter how many layers. The viles of glitter are generous, depending of course how often you glitter, but mine are still half way full after 4 months!

Note: The only problem with using a lot of layers of glitter both loose and polish is that you need to be prepared to scrub harder when removing it!!

One of the most important things about using any sort of embellishment whether it be craft glitter or micro beads is how the colors hold, and Martha Stewart glitters deliver! Some glitters bleed into nail polish or when your at the end of manicure and it bleeds when putting on top coat... that's the worst!
However I have found that Seche Vite - fast dry top coat is less likely to cause bleeding, and O.P.I.- top coat almost always makes poorly dyed embellishments bleed, which can ruin the design!

Now as far as the glue is concerned I haven't used it, but I'm confident it is more than adequate for crafting on paper and such, but obviously not meant for nails.

All in all if you see Martha Stewart in a craft store next fall I highly recommend buying it! you will not be disappointed! This specific 6 pack of colored glitter is seasonal, however there are other color combos offered all through out the year.

You can buy the 6 pack of martha stewart glitters at Michaels, Jo Ann fabric and crafts, and other craft stores, or online HERE

December 28, 2011

Tutorials

Hello all,


Three tutorials are now available for trying out on my TUTORIAL PAGE!


If you try any of these I would love to see images of your results! and I ask that you credit and link back to me!


December 27, 2011

UPDATE!!!

Hi guys,

navigating this blog just became easier!


You can now search through posts using 5 categories of labels: STYLE, COLOR, EMBELLISHMENT, BRAND and OTHER- which includes material, level of difficulty, personal notes and much more!

You can also browse other blogs on my BLOG ROLL TAB, which lists all the blogs I currently follow in alphabetical order. As well as the 25 most recently updated sites which appear on the lower right hand side of the blog at all times.

Another tab available is the Challenge tab which will show links to completed challenges and special posts.
You can also see product reviews on the REVIEWS tab,  HOW-TO's for some of my designs can be found on the TUTORIAL page, and amazing blogger giveaways on the GIVEAWAYS page!

If you encounter any problems with any links, or would like YOUR BLOG to appear on the blog roll tab please email me at basecoattopcoat.kelly@gmail.com

Thank you,

Kelly

December 26, 2011

mommicure II

My mom was so excited about the last manicure I gave her, that she had asked me to do another!
Her outfit was black with silver and gray accents, so i wanted them to match! Again, she was so proud, and it was so cute! Hope everyone had a fantastic holiday!


I realized i never include this part, but I ALWAYS use O.P.I.- natural nail strengthener, and O.P.I. - natural base coat before doing any manicure.

For this manicure I used 2 coats of O.P.I. - lucern - tainly look marvelous.
Then I created a pattern that went around the base of each nail and moved towards the top, on her pinky, middle and thumb, with small hexagonal glitter in black and silver. Once I did the first nail it went so quick, but it was incredibly time consuming, placing the glitters one by one.
I then secured it with Seche VITE - quick dry top coat.

December 25, 2011

24 days of XMAS Challenge : Day 24


Merry Christmas Eve and Happy Holidays! For my final day of the 24 day nail challenge, the theme was to recreate your favorite nail design. Now, I decided that Jack Skellington was very appropriate for the theme, it being the night before christmas and all, and I wasn't ready to part with dear old Jack, so instead of doing a new set of nails I added on and did ZERO his dog! His colors work with both Jack and the holiday color palette, only more white is involved... he's a ghost. For those of you who aren't familiar with this movie... go watch it NOW!...but basically this is how it goes:


Jack is tired of being the Pumpkin King and stumbles across Christmas Town. He decides that he will relieve SANDY CLAWS and remake Christmas, only the monsters of halloween town don't understand what Christmas is all about, and so he gives them what they want... a terrifying holiday. His friend Sally thinks he is making a mistake, and in her attempt to stop him she creates fog so that he can not see, and will hopefully give up. (sound familiar... Rudolph?) However Jack's ghost dog Zero has a glowing red nose and stands in as the lead reindeer lighting the way to what becomes a twisted christmas and Jack's, almost, ruin. Jack's "presents" create a frenzy causing him to be shot out of the sky, leading him to his realization of what he has done. Trying to redeem himself and save the holiday, Jack rescues Santa from the Boogeyman just in time to save christmas. THE END
This is one of my all time FAVORITE movies... obviously :)
Now that you have the background, here are my nails! enjoy!


To see more of the Jack Skellington nails click HERE


Just like the JACK SKELLINGTON nails i did for day 23 of the challenge, I used Sally Hansen - shell we dance? (#160) 3 coats, Sinful colors - out of this world (#842), 1 coat, for the base.
I then used Nail Star - red for the collar, O.P.I. - designer de better for shading and black and white acrylic paint. I then added a red rhinestone cabochon for Zero's nose and topped it off with seche VITE - quick dry top coat.


be sure to check out these ladies to see their holiday best!
Thanx for tuning in, and i hope everyone had a great holiday!

December 24, 2011

24 days of XMAS Challenge : Day 23

Here is the final theme, before recreating my favorite manicure (tomorrow), It's SANTA!
well... not exactly santa.... more like my favorite impostor, JACK SKELLINGTON dressing up as SANTA.
I drew my inspiration from an illustration by Tim Burton (my favorite!)
I liked the patterning in the outfit and the gangly body posture that is very much Jack and wanted to capture those aspects per nail. I call them my night before christmas EVE nails. :)


For the base color I used 3 coats of Sally Hansen - shell we dance? (#160)  and 1 coat of Sinful Colors - out of this world (#842).
Jack Skellington was done using Nail Star - white (#108), O.P.I. - designer... de better for shading on the face, Nail Star - red and black acrylic paint.
Finished it off with 1 coat of Seche VITE - quick dry top coat.  For some reason this read is not as vibrant in this picture when uploaded, disappointing.
From thumb to pinky the images go as such. thumb - bottom part of beard, index - hat, middle - head/top part of beard, ring - neck/body/shoulder, pinky - arm.

To see more SANTA themed nails check out these ladies blogs:

December 23, 2011

24 days of XMAS Challenge : Day 22

Better late than never... Here are my day 22 of the 24 days of xmas challenge nails, with the theme ELVES or ELF. I wanted create a nail design that could work with this theme without having to do a portrait or a specific object of or relating to elves, although no looking back on it, if i were to redo this design I'd probably do something relating to a toy shop. However I've been making presents all day and therefore I have little energy left for intense nails right now. The part of the elf i drew inspiration from was ELF TIGHTS (or socks, stockings w.e) What is always used in depicting christmas elves, other than pointy ears , being small in height (with the exception of Will Ferrel) and hats are their brightly colored stockings! Some are solid in color, but most are striped and range in mixes of yellow, green, white and red. 

To make it a little more fun I used a nail polish base and striped with rhinestone cabochons, creating a OMBRE-STONE effect from one nail to the next to try and make the colors work together!
 They go as such, from thumb nail to pinky nail.
yellow + red - red +white - red + green - green + white - green + yellow.


Again, starting with the thumb I used Urban Outfitters - orange 3 (its more of a golden yellow than orange) about 3-4 coats, then used red rhinestone cabochons. Next nail I used Ruby Kisses - french White, also 3-4 coats, and then used both red and white rhinestone cabochons to break up the design a little. The middle finger has a Chanel - nirvana, 2 coats (gorgeous color with a light gold luster) and used red and green rhinestone cabochons to ease transition into the next nail. The ring finger uses the same Ruby Kisses - french white, 3-4 coats as a base, and like the index, has white cabochons alternating in, but with green. Finally On the pinky I used the same orange 3, 3-4 coats, and only incorporated green rhinestones for the stripes. 
This time I used O.P.I. - top coat instead of my usual Seche VITE.

Unfortunately I broke my pinky nail yesterday so the nail looks disproportional to the others. 

WE ARE ALMOST DONE!!! Tomorrow (today) is the last themed nail before a manicure of choice!
Suitably it is SANTA themed nails!


To see more of ELF themed nails check out these ladies blogs:

December 22, 2011

24 days of XMAS Challenge : Day 21


My internet connection was knocked out by rain last night, and I'm just now getting it back... so without further delay, here are my REINDEER/RUDOLPH themed nails (day 21 of the 24 days of xmas challenge!)


I took a sort of morbid/humored approach to this design being that I did normal reindeer the day before. I also have set a goal for myself for this challenge; to try and make my nails have as much variety as possible by pushing alternative christmas imagery and typical christmas color palettes. 


As you can see I illustrated 3 reindeer skulls (one of them being Rudolph) and two holly-across-bones (skull and crossbones... get it? lol, maybe?!) 
I decided that a softer, feminine color would detract from the morbid imagery, and that the hint of metallic luster would make it feel less flat.
Unfortunately when the internet went out I decided in the meantime I would paint some presents I am making and ended up getting some acrylic paint stuck to my nails and sort made it a little funky in places  :( but hopefully it isn't too distracting. Enjoy!


For the base color I used Love & Beauty - Lavender 1 coat, and to add a nice metallic shine to it, I added Sinful Colors - out of this world (#842), which is a nice consistent sheer micro micro micro glitter.
I wanted to create my own warm grey, but after putting on my top coat the purple really came through!


For the rest of the design I used acrylic paint, and circular and almond shaped rhinestone cabochons for the holly. I then finished it off with my trusty Seche Vite - quick dry top coat.


Todays theme which I will be posting later today is EL/F/VES so stay tuned!


To see more of RUDOLF and the other REINDEER check out these ladies blogs:

December 21, 2011

24 days of XMAS Challenge : Day 20


FOUR DAYS LEFT! CRAZZZYYYY! 


SLEIGH/SLED was the theme for today! I chose to do santa's sleigh, reindeer flying over the moon. :)
I used a mix of nail polish and acrylic paint which allowed for a much smoother (less sticky) application of my design.


The color fade background was done using a base of Sally Hansen - marine scene (#23), 3 coats, and acrylic paint.  On top of that I used NYC - starry silver glitter (#105) which has a nice mix of silver and iridescent micro glitter mixed with medium sized hexagonal blue and pink glitter in a clear polish... It's really pretty! For the design I used all acrylic paint, and then sealed it with the amazing Seche VITE - quick dry top coat.


Tomorrows theme is REINDEER


To see more SLEIGH/SLED themed nails check out these ladies blogs:

December 19, 2011

24 days of XMAS Challenge : Day 19


Another "nouveau" french design mixed with the 1/2 moon, for day 19 of the 24 day challenge! The theme for today was SANTA HATS, and there were 3 elements i wanted to include fur trim, ball tassel and bells (but in this case, gold nail art beads)


The base coat was done using O.P.I. - i'm not really a waitress, 2 coats
The 1/2 moon and french tip were done with 2 coats of O.P.I. - kyoto pearl, next i put the glitter down over the white parts, but because the red is so powerful and the kyoto is so sheer the snow has a pink tint. The glitter I used is a iridescent white micro glitter which catches the light adding specks of greens and pinks. Next I created a window pattern on the red with gold beads for the "bells," finally a heavy coat of Seche VITE - quick dry top coat


Tomorrow is SLEIGH/SLED themed!


To see more SANTA HATS check out these ladies blogs:

mommicure

Did my moms nails for an xmas party! she never EVER gets designs... and she generally only wears reds and pinks so this was exciting for the both of us.


I used O.P.I. - designer...de better, 2 coats for the base, and then adhered the red and green rhinestone cabochons using 10 Professional Nail Lacquer - perfectly clear (#401), finally a coat of seche VITE - quick dry top coat!
She was so excited, it was awesome! :)

December 18, 2011

24 days of XMAS Challenge : Day 18


Here are my STOCKING themed nails, day 18 or the 24 day XMAS CHALLENGE! (WOAH!)
The thing i love most about christmas stockings ( other than their contents!!) is the different fabrics and patterns they are made of. I focused on the funky mix of different flannel fabrics that are commonly seen on homemade stockings. 


Starting with the thumb i used O.P.I. - jade is the new black as the base color, then created a plaid pattern using Nail Star - medium metallic green  and Nail Star - white (#108).   I then wanted to include a 3D element without having to use something 3D, so I painted on a button using Love & Beauty - gold,  Nail Star - white (#108) for the highlight and Nail Star - black (#109) for the shadow and center.


The red nail was done using Chanel - laque rouge base 2 coats with Kiss - gold striper swirls.
The middle finger has a base coat of Ruby Kisses - french white, 3 coats, Nail Star - red  stripes, Nail Star - medium metallic green dots. The Ring finger was also done with 3 coats of Ruby Kisses - french white, the dots were done using Nail Star - black dots with Kiss - gold striper on top. Finally an outline of a heart was added using the same black.


The last nail was done using O.P.I. - jade is the new black  2 coats, with a white dot pattern done with Nail Star - white (#108)

i hope you like them :) 
Tomorrow is Santa Hats!


To see more STOCKING themed nails check out these ladies blogs:
Thanx for stopping by :)