Showing posts with label nailstar. Show all posts

May 03, 2012

purple panel ikat

purple nails ready for spring!


What I used:
O.P.I. - natural nail strengthener
O.P.I. - natural nail base coat
Love & Beauty - lavender
Love & Beauty - sheer purple glitter
Nail Star - white striper (108)
Nail Star  - wine striper
Nail Star  - black striper (109)
Kiss - soft purple striper
Kiss - bikini pink striper
10 PNL - perfectly clear (401)


and of course my nail design wouldn't feel complete without embellishments!
so i added small soft purple rhinestones at the top and base of my nail design and soft purple nail art beads in a random pattern on my thumb and ring finger for statement nails!


February 03, 2012

eye ♥ U

Valentines day nail medley featuring  bleeding hearts, eye <3 U and pink roses.


I used Sally Hansen - shell we dance?, NYX - NP 21 flash, Sally Hansen - pink promise (#06), Anise - a bud for you, Butter London - rosie lee, American Apparel - coney island, O.P.I. - ogre-the-top blue, Revlon - revlon red (#680), Nail Star - white, Nail Star - yellow, Nail Star - red and black gouache.
For decoration I used iridescent pink bar glitter and rhinestone cabochons. Finally I sealed the design with Seche VITE - fast dry top coat.

January 29, 2012

Robert Cavalli inspired nails

 Got more baggage... inspired by Roberto Cavalli bag from the spring 2012 collection


base color 3 coats O.P.I. - kyoto pearl, Nail Star - black for the stripes and flower outline.
Nail Star - white for the base color of the flowers, and Love & Beauty - royal, L.A. girl F.L.A.R.E. and Love & Beauty - lavender. I finished the design off with Seche Vite - dry fast top coat.

January 28, 2012

Jimmy Choo inspired nails

inspired by Jimmy Choo spring 2012 cuff+clutch, on my newly trimmed nails (semi- sad :(...) now if i only owned the bag to match...


The base color is Ruby Kisses - french white 3 coats, and the black spots and lines were done using Nail Star - black. Next the line was done using Kiss - red wine striper, and gold nail art beads. 
The top of the design was done using Sinful Colors - cloud 9, 2 coats, and O.P.I. - hong kong sunrise, with 1 coat of Revlon - pink chiffon (#911) on top to create a peachy pink. I finally topped off the design with a silver rhinestone at the top of the "V" to add some bling, and topped off the design O.P.I. - top coat. 

January 25, 2012

pink + purple ombre layered!

As i said i'm really into the layered look lately...


First the ombre: I applied two coats of American Apparel - coney island which is an awesome opaque baby pink. I then applied one layer of Sally Hansen Diamond Strength - pink promise (#06) which is a tinted baby pink sheer micro glitter, and looks awesome over pinks and other warm colors.  Next i used Love & Beauty - lavendar, Kiss - soft purple striper and O.P.I. - funky dunky to finish the pink to purple ombre.

The layered design was created using Kiss - red wine (striper)  for the outline. I then filled in random sections of the design using Nail Star -  metallic opaque silver, and Kiss - gold glitter striper.
Seche VITE - fast drying top coat .... end.

BLING BLUE!

I've been really into layering embellishments over patterns lately...


For the base color i used Revlon - midnight affair (#791), the leopard was done using Nail Star - pearl blue and Kiss - blue striper. I then used Seche VITE to seal the design. Next I placed the rhinestone cabochons and created false settings around them using gold nail art beads. 

January 23, 2012

greek chic

Funky greek design!


After applying 1 coat each of O.P.I. - natural nail strengthener and O.P.I. - natural base coat, I then applied 3 coats of Ruby Kisses - french white.  Then using, American Apparel Neon - neon coral, Nail Star - white, Kiss - bronze (striper), and Nail Star - opaque silver I created this greek-like design. I then embellished using silver cabochons and iridescent orange small hex glitter, All topped off with Seche VITE.

January 12, 2012

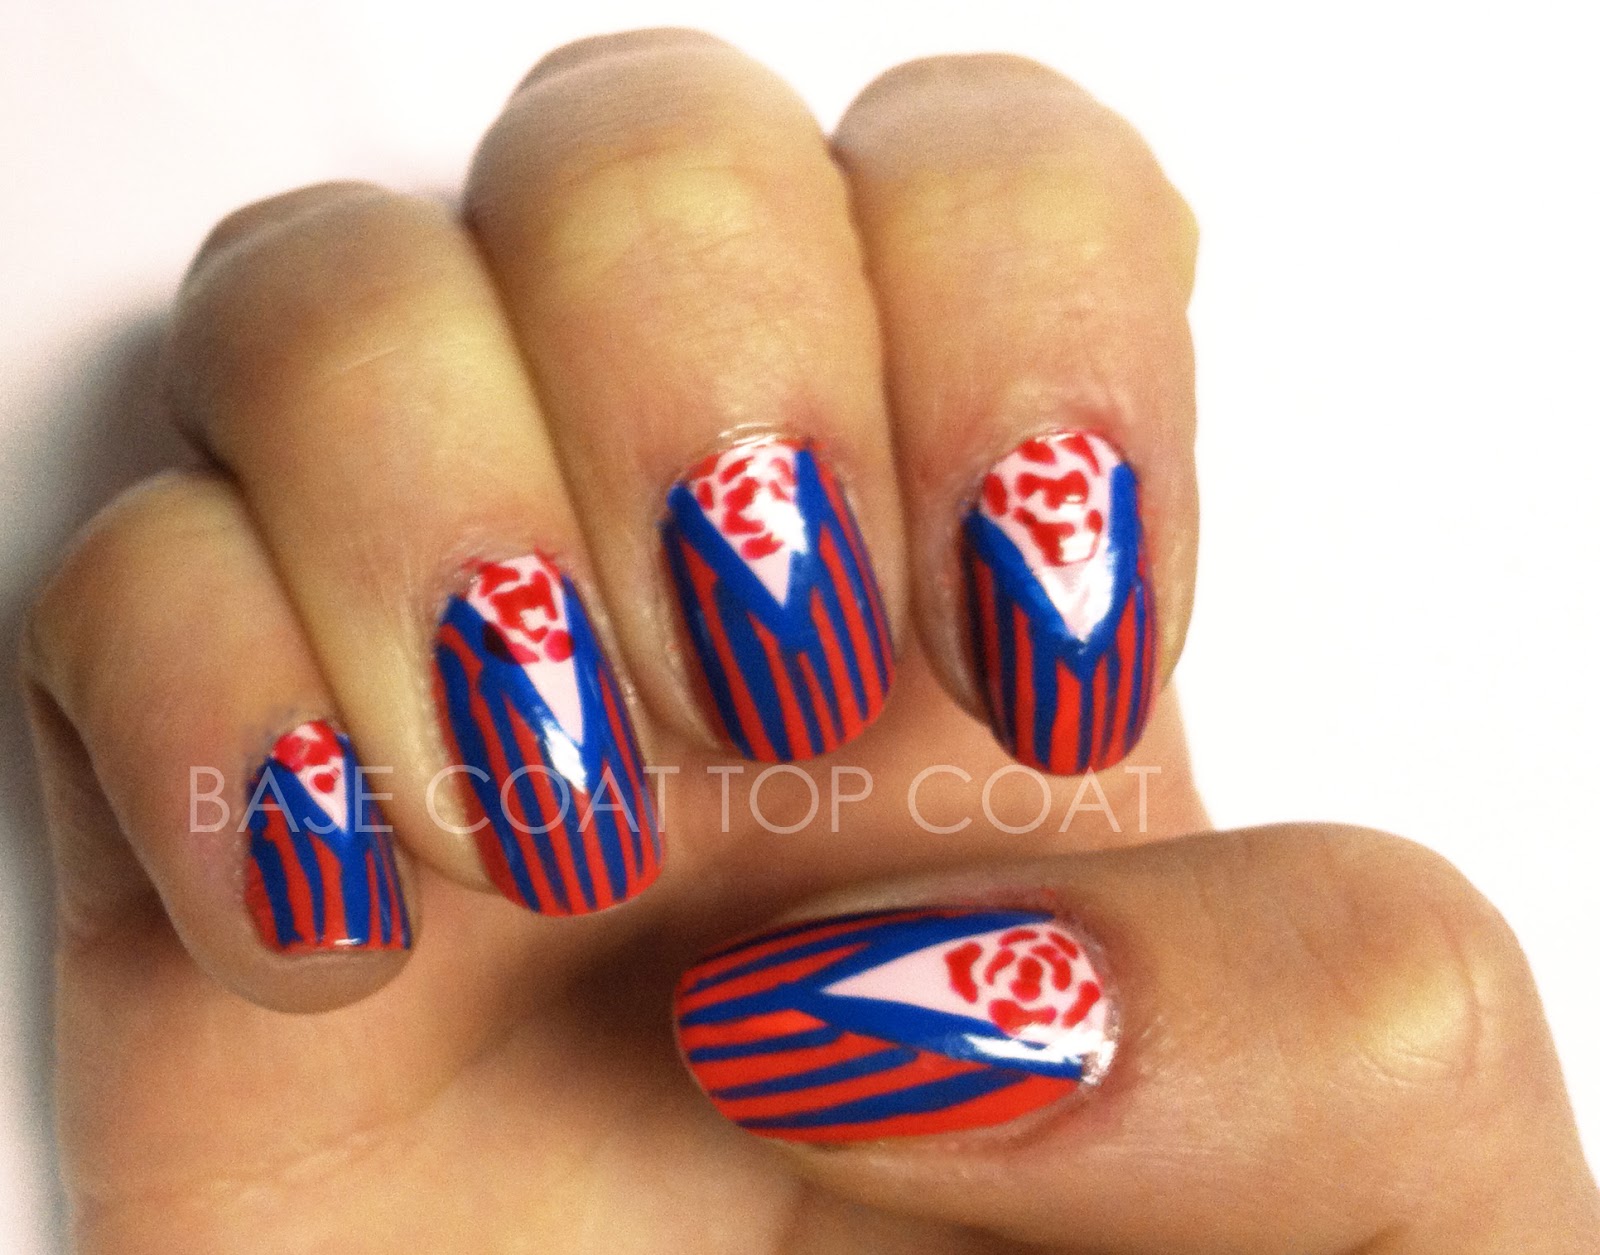
stripe suit

These nails were kind of a random thought. I knew i wanted to  have a pink v-gap with a flower inside, but the blue was chosen soley because red and blue are colors i rarely use together.  I decided that i would use the blue to subdue the intense coral color. I used the blue to outline the Vgap and then added vertical stripes over the coral which from a distance, makes it appear like a color fade from blue to purple to coral. Unfortunately the highlights of the nails are seriously distracting, sorry! and The baby pink triangle was chosen to offset the rest of the design and enhance the directionality of the nail through contrast in color.


The reddish color is Love & Beauty - coral, 3 coats. The baby pink vgap was done using American Apparel - coney island 1 coat. The blue stripes and outline was done using Kiss - blue striper,  and the rose is Nail Star - red.


kelly

January 11, 2012

pink ombre polka dots

Hey guys,

I apologize for being so absent lately, however something so sweet just happened....So i just received a sort of care package jammed in my mailbox from a friend, she gave me 14 nail polishes that she didn't want! So amazing! they've all only been used once or twice too! (thanx Amara! :) )
One of the colors I received was the awesome barbie pink, although i don't wear pink a lot, it is my FAVORITE kind of pink, and i am constantly looking for the perfect barbie pink. Anyways So i decided that I would make an ombre using a second barbie pink! (amazing) and a darker O.P.I. magenta for the tip! This is only my second or third time doing an ombre, an i almost wish it was a more drastic color fade, NEXT TIME.


For the base color I used NYX - flash, 3-4 coats, its a dusty pink creme, that looks super plastic-like on, (i mean that in a good way, of course.) Next using a makeup sponge I added Anise - a bud for you, pink creme, also super fake looking, and really bright. I love this color! Last for the darkest part of the color fade, on the tip, i used O.P.I. - jewel of india, magenta jelly, with a really nice luster.
With the dotting tools my sister got me for christmas, I made my polka dots using Nail Star - white! 
I guess i was feeling girly today?!

thanx for stopping by.

December 25, 2011

24 days of XMAS Challenge : Day 24

❄❇❅❆✺❃❉❄❇❅❆✺❃❉❄❇❅❆✺❃❉❄❇❅❆✺❃❉❄❇❅❆✺❃❉
Merry Christmas Eve and Happy Holidays! For my final day of the 24 day nail challenge, the theme was to recreate your favorite nail design. Now, I decided that Jack Skellington was very appropriate for the theme, it being the night before christmas and all, and I wasn't ready to part with dear old Jack, so instead of doing a new set of nails I added on and did ZERO his dog! His colors work with both Jack and the holiday color palette, only more white is involved... he's a ghost. For those of you who aren't familiar with this movie... go watch it NOW!...but basically this is how it goes:


Jack is tired of being the Pumpkin King and stumbles across Christmas Town. He decides that he will relieve SANDY CLAWS and remake Christmas, only the monsters of halloween town don't understand what Christmas is all about, and so he gives them what they want... a terrifying holiday. His friend Sally thinks he is making a mistake, and in her attempt to stop him she creates fog so that he can not see, and will hopefully give up. (sound familiar... Rudolph?) However Jack's ghost dog Zero has a glowing red nose and stands in as the lead reindeer lighting the way to what becomes a twisted christmas and Jack's, almost, ruin. Jack's "presents" create a frenzy causing him to be shot out of the sky, leading him to his realization of what he has done. Trying to redeem himself and save the holiday, Jack rescues Santa from the Boogeyman just in time to save christmas. THE END
This is one of my all time FAVORITE movies... obviously :)
Now that you have the background, here are my nails! enjoy!


To see more of the Jack Skellington nails click HERE


Just like the JACK SKELLINGTON nails i did for day 23 of the challenge, I used Sally Hansen - shell we dance? (#160) 3 coats, Sinful colors - out of this world (#842), 1 coat, for the base.
I then used Nail Star - red for the collar, O.P.I. - designer de better for shading and black and white acrylic paint. I then added a red rhinestone cabochon for Zero's nose and topped it off with seche VITE - quick dry top coat.


be sure to check out these ladies to see their holiday best!
Thanx for tuning in, and i hope everyone had a great holiday!

❄❇❅❆✺❃❉❄❇❅❆✺❃❉❄❇❅❆✺❃❉❄❇❅❆✺❃❉❄❇❅❆✺❃❉

December 24, 2011

24 days of XMAS Challenge : Day 23

❄❇❅❆✺❃❉❄❇❅❆✺❃❉❄❇❅❆✺❃❉❄❇❅❆✺❃❉❄❇❅❆✺❃❉
Here is the final theme, before recreating my favorite manicure (tomorrow), It's SANTA!
well... not exactly santa.... more like my favorite impostor, JACK SKELLINGTON dressing up as SANTA.
I drew my inspiration from an illustration by Tim Burton (my favorite!)
I liked the patterning in the outfit and the gangly body posture that is very much Jack and wanted to capture those aspects per nail. I call them my night before christmas EVE nails. :)


For the base color I used 3 coats of Sally Hansen - shell we dance? (#160)  and 1 coat of Sinful Colors - out of this world (#842).
Jack Skellington was done using Nail Star - white (#108), O.P.I. - designer... de better for shading on the face, Nail Star - red and black acrylic paint.
Finished it off with 1 coat of Seche VITE - quick dry top coat.  For some reason this read is not as vibrant in this picture when uploaded, disappointing.
From thumb to pinky the images go as such. thumb - bottom part of beard, index - hat, middle - head/top part of beard, ring - neck/body/shoulder, pinky - arm.

To see more SANTA themed nails check out these ladies blogs:

❄❇❅❆✺❃❉❄❇❅❆✺❃❉❄❇❅❆✺❃❉❄❇❅❆✺❃❉❄❇❅❆✺❃❉

December 18, 2011

24 days of XMAS Challenge : Day 18

❄❇❅❆✺❃❉❄❇❅❆✺❃❉❄❇❅❆✺❃❉❄❇❅❆✺❃❉❄❇❅❆✺❃❉
Here are my STOCKING themed nails, day 18 or the 24 day XMAS CHALLENGE! (WOAH!)
The thing i love most about christmas stockings ( other than their contents!!) is the different fabrics and patterns they are made of. I focused on the funky mix of different flannel fabrics that are commonly seen on homemade stockings. 


Starting with the thumb i used O.P.I. - jade is the new black as the base color, then created a plaid pattern using Nail Star - medium metallic green  and Nail Star - white (#108).   I then wanted to include a 3D element without having to use something 3D, so I painted on a button using Love & Beauty - gold,  Nail Star - white (#108) for the highlight and Nail Star - black (#109) for the shadow and center.


The red nail was done using Chanel - laque rouge base 2 coats with Kiss - gold striper swirls.
The middle finger has a base coat of Ruby Kisses - french white, 3 coats, Nail Star - red  stripes, Nail Star - medium metallic green dots. The Ring finger was also done with 3 coats of Ruby Kisses - french white, the dots were done using Nail Star - black dots with Kiss - gold striper on top. Finally an outline of a heart was added using the same black.


The last nail was done using O.P.I. - jade is the new black  2 coats, with a white dot pattern done with Nail Star - white (#108)

i hope you like them :) 
Tomorrow is Santa Hats!


To see more STOCKING themed nails check out these ladies blogs:
Thanx for stopping by :)

❄
❇❅❆✺❃❉❄❇❅❆✺❃❉❄❇❅❆✺❃❉❄❇❅❆✺❃❉❄❇❅❆✺❃❉

December 16, 2011

24 days of XMAS Challenge : Day 16

❄❇❅❆✺❃❉❄❇❅❆✺❃❉❄❇❅❆✺❃❉❄❇❅❆✺❃❉❄❇❅❆✺❃❉
Today's theme (day 16) for the 24 day's of christmas challenge is LIGHTS!
I decided to go a different route for lights and instead use candle lights as my inspiration. One of my favorite things about the days leading up to the holidays is the candles my mom puts out. They smell so festive and add create an aroma for christmas that is just AMAZING. She also puts candle - lights (with bulbs) in all the windows and when outside it looks so pretty! Now although i didn't use any traditional christmas colors I think that the nails are warm and bright. I've also been interested in using alternative christmas colors because i got tired of using red and green all the time.


For the base color I used Love & Beauty - grey (with gold shimmer)  2 coats
For the candle LIGHT i first used Kiss - yellow striper  then Kiss - orange striper  on top of that
Next I used Nail Star - copper shimmer, and for the  "light" around the flame I first had to put Kiss - white striper so that when i put a layer of Kiss - orange striper  it would really POP!
For the candle I used Kiss - White striper, and for the dripping wax shadow (which is kind of hard to see) I used Nail Star - silver shimmer (#114) For the wick I used  Kiss - black , For the flame I first put down Kiss - white striper, then Kiss - yellow striper, and Kiss - orange striper. Finally I put a gold cabochon at the base of the flame for that extra shine! Then to fill up some of the negative space i used Kiss - orange striper  in a radial pattern around the design.

tomorrow is TINSEL time!

want more LIGHTS? check out these ladies blogs:
Thanx for stopping by :)

❄
❇❅❆✺❃❉❄❇❅❆✺❃❉❄❇❅❆✺❃❉❄❇❅❆✺❃❉❄❇❅❆✺❃❉

December 14, 2011

24 days of XMAS Challenge : Day 14

❄❇❅❆✺❃❉❄❇❅❆✺❃❉❄❇❅❆✺❃❉❄❇❅❆✺❃❉❄❇❅❆✺❃❉
A few days ago my parents, my boyfriend and I decorated the christmas tree! As I unwrapped the ornaments I was flooded with memories. Memories of being a kid and LOVING how some said my name, some i made, some that were my grandmothers, and some that have been on the tree for as long as I can remember. It was nice to see the ornaments that i remember from my youth, as well as a few new ones that I decided for todays challenge, with the theme ORNAMENTS I would look at and recreate some of the ornaments from the tree! Now because my nails are not as big as i want, and my design included other elements I couldn't do the really complicated ones, but still the ones chosen are tied to my christmas history.
Below are the ornaments/ decorations I was inspired by, and my ORNAMENT themed nails!


For the base color I used Sally Hansen - spark (#06) which is a really beautiful color. the polish itself it a greenish blue (which can only be noticed if smeared), but appears as a solid micro micro micro glitter iridecent blue to purple effect. Maybe its because this polish is not so new, but it was a one coater! I get tired of using the typical christmas palette so I thought a deep blue purple would make the ornaments and decoration pop out as well as be refreshing to use.


Next for all the fingers I took my Nail Star - silver (#114) and made a 1/2 moon of tinsel/branch for the ornaments to hand on. Then using my Ruby Kissed - french white  I dotted some circles on the silver.
Also after each ornament was finished i filled in the negative space with more dots and snowflake/stars in the same silver. Finally gold nail art beads were placed on top of each ornament to act as a ornament hook.


Starting on the thumb: for the ornament with the bow I used Love & Beauty - gold, then put gold bar glitter on top the O.P.I. because the ornament i was inspired by is a large glass orb with a gold netting around it. For the bow I used turquoise nail art beads to tie in some of the same color of one of the angels. The peppermint swirl ornament was inspired by this really beautiful Waterford Crystal peppermint ornament, and is kind of opal and metallic looking. To capture that shine I used Ruby Kisses - french white  and Kiss - red, and then added micro glitter on top of the red for the shine.


The index and ring finger with the angels were done the same so i'll do them together... So first I used round and (american :) ) football shaped cabochons in magenta, pink and aquamarine, the wings i used Kiss - white striper with Kiss - gold  glitter striper.  For the bottom of the angels and the center between the head and body I used magenta, light pink and light blue nail art beads. These angels were inspired by ornaments my grandmother gave to my mom. They are Swarovski crystal and are colored according to my families birthstone, my mom feb- amethyst, my sister oct - rose quartz and mine and my dads- march - aquamarine. These are my favorite nails because i think they were most successful.


The stars were done similar to the wings, I used A base of Kiss - white striper, Kiss - gold glitter striper then added some yellow micro glitter. Finally for the heard I used Nail Star - silver (#114), then covered it with red micro glitter.  Then 3 thick coats of Seche VITE -  quick dry top coat.


Tomorrows theme is PRESENTS!

For more ORNAMENT themed nails check out these ladies blogs:
Thanx for stopping by :)

❄
❇❅❆✺❃❉❄❇❅❆✺❃❉❄❇❅❆✺❃❉❄❇❅❆✺❃❉❄❇❅❆✺❃❉

December 13, 2011

24 days of XMAS Challenge : Day 12

❄❇❅❆✺❃❉❄❇❅❆✺❃❉❄❇❅❆✺❃❉❄❇❅❆✺❃❉❄❇❅❆✺❃❉
Hey everyone! So i finished these a few hours ago but had some things to do. so here they are now, my HOLLY themed nails.. day 12 of the 24 days of xmas challenge! What I wanted for this challenge, was have a sort wallpaper effect. I used muted red and green and a white to add to the wallpaper feel,  with interchangeable white, red, silver and gold for the holly, and as you can see a gestural as opposed to tight holly print. And decided to add to it even further and making it a patterned/embellished gold tip french. 
I also included a picture of the nail plate i made which i used to figure out which colors to use


The base colors I used were Ruby Kisses - french white, Love & Beauty - mint and American Apparel - coney island. 
The holly on the white nail i used Kiss - gold glitter striper,  and Nail Star - red opaque, On the mint nail I used Nail Star - opaque silver (#114) Nail Star - red, and for the pink i used Nail Star - white 108 and Nail Star - opaque red again. 
Next I added a line of auburn nail art beads, and then filled in the space between the nail art beads to the top of my nail with Kiss - gold glitter striper... Seche Vite

If you'd like to know which colors i used for a specific nail on the holly wheel, then let me know!

Stay tuned for tomorrows nail art themed CHRISTMAS TREES!

To see a tutorial for this design visit the TUTORIAL PAGE.

More boughs of HOLLY nails can be seen HERE:
Thanx for stopping by :)

❄
❇❅❆✺❃❉❄❇❅❆✺❃❉❄❇❅❆✺❃❉❄❇❅❆✺❃❉❄❇❅❆✺❃❉