Showing posts with label all//polish. Show all posts

January 29, 2012

Robert Cavalli inspired nails

 Got more baggage... inspired by Roberto Cavalli bag from the spring 2012 collection


base color 3 coats O.P.I. - kyoto pearl, Nail Star - black for the stripes and flower outline.
Nail Star - white for the base color of the flowers, and Love & Beauty - royal, L.A. girl F.L.A.R.E. and Love & Beauty - lavender. I finished the design off with Seche Vite - dry fast top coat.

January 25, 2012

pink + purple ombre layered!

As i said i'm really into the layered look lately...


First the ombre: I applied two coats of American Apparel - coney island which is an awesome opaque baby pink. I then applied one layer of Sally Hansen Diamond Strength - pink promise (#06) which is a tinted baby pink sheer micro glitter, and looks awesome over pinks and other warm colors.  Next i used Love & Beauty - lavendar, Kiss - soft purple striper and O.P.I. - funky dunky to finish the pink to purple ombre.

The layered design was created using Kiss - red wine (striper)  for the outline. I then filled in random sections of the design using Nail Star -  metallic opaque silver, and Kiss - gold glitter striper.
Seche VITE - fast drying top coat .... end.

January 16, 2012

teal tie-dye

For this design I wanted to create a sort of died fabric effect using this awesome TEAL color I just received from a friend. All this requires is a base color and a minimum of 3 striper polishes, or 3 colors and thin brush to get this look. Because I was using a green-teal base I chose colors that I felt would compliment but not overpower the base.


After O.P.I. - natural nail base coat I applied 3 layers Milani - fresh teal  Next I used Kiss- blue striper to start the dyed pattern, I choose this color because It was similar to the teal, and tied the teal and the rest of the palette together. Next, keeping in mind that I just used blue, I choose Kiss - soft purple striper and followed along the outside of the blue patter. I then did the same with my final color Kiss - red wine striper outside the light purple. I then used 1-2 coats of Seche VITE - fast dry top coat.

January 12, 2012

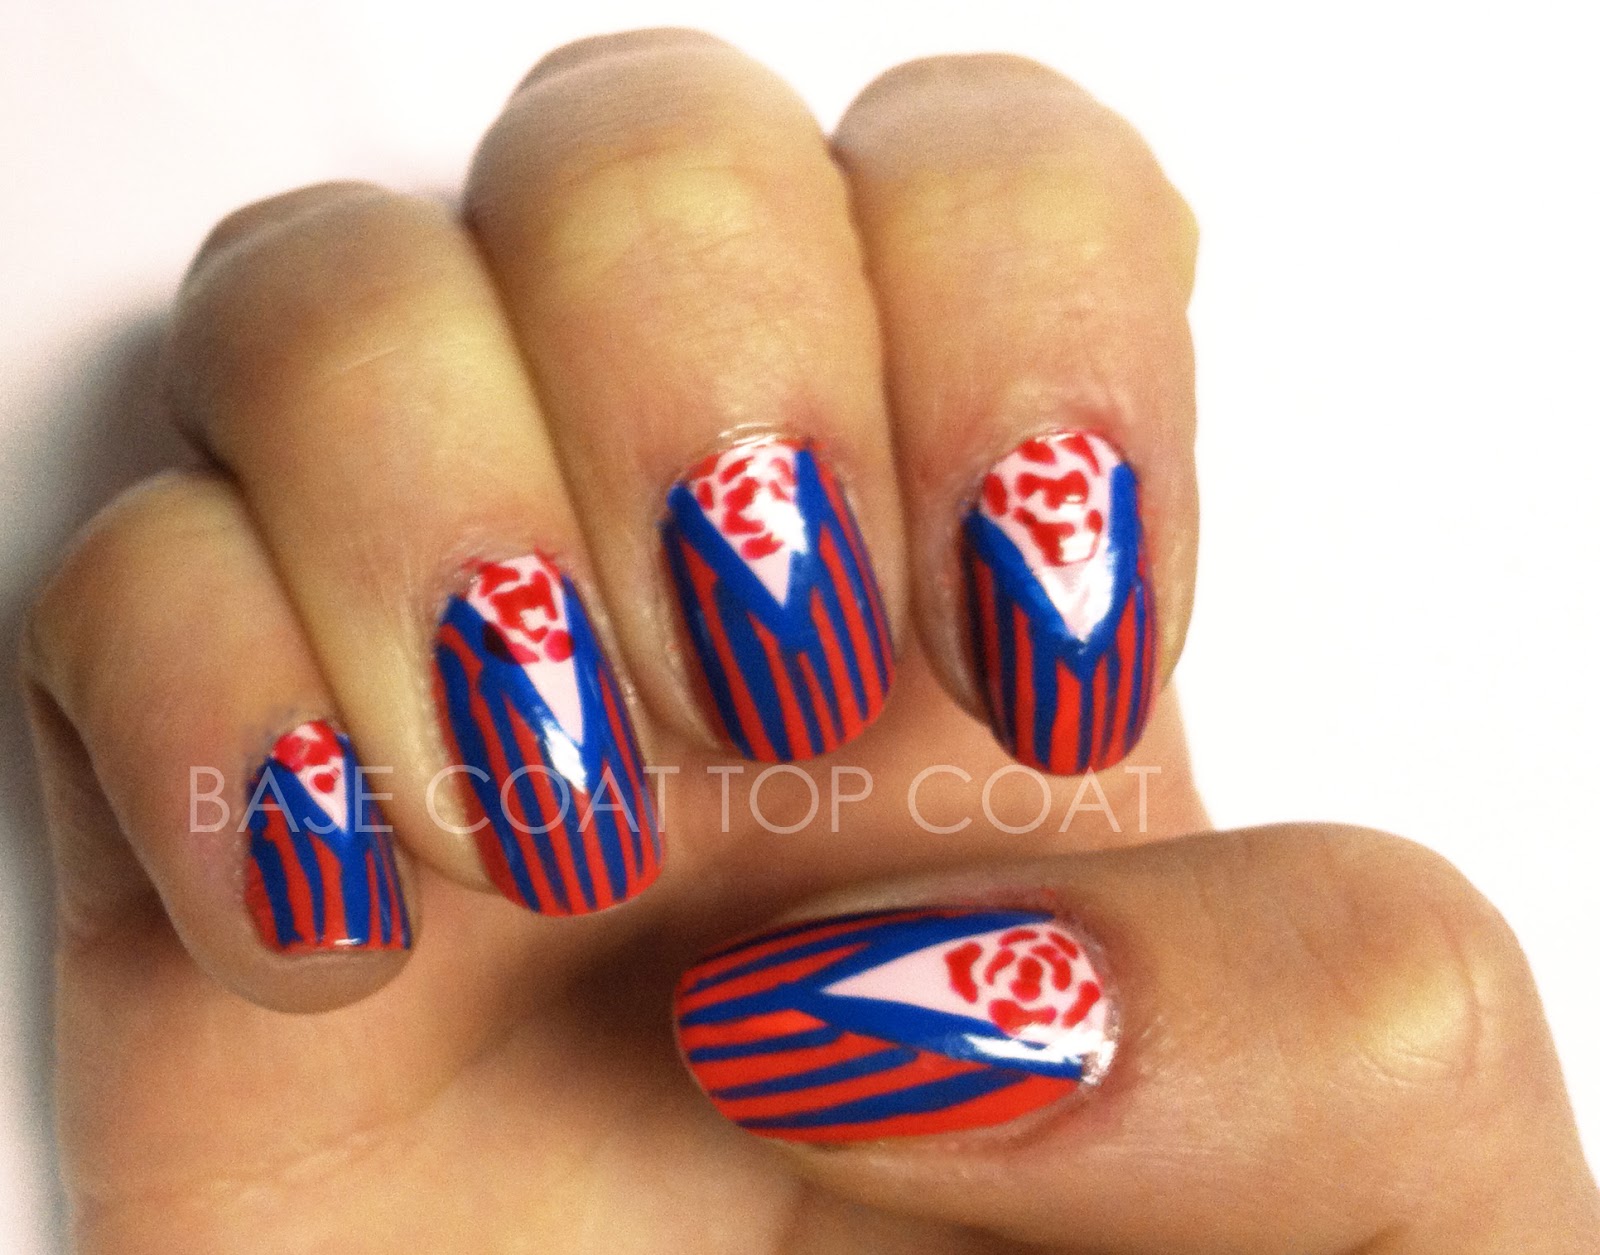
stripe suit

These nails were kind of a random thought. I knew i wanted to  have a pink v-gap with a flower inside, but the blue was chosen soley because red and blue are colors i rarely use together.  I decided that i would use the blue to subdue the intense coral color. I used the blue to outline the Vgap and then added vertical stripes over the coral which from a distance, makes it appear like a color fade from blue to purple to coral. Unfortunately the highlights of the nails are seriously distracting, sorry! and The baby pink triangle was chosen to offset the rest of the design and enhance the directionality of the nail through contrast in color.


The reddish color is Love & Beauty - coral, 3 coats. The baby pink vgap was done using American Apparel - coney island 1 coat. The blue stripes and outline was done using Kiss - blue striper,  and the rose is Nail Star - red.


kelly

January 11, 2012

pink ombre polka dots

Hey guys,

I apologize for being so absent lately, however something so sweet just happened....So i just received a sort of care package jammed in my mailbox from a friend, she gave me 14 nail polishes that she didn't want! So amazing! they've all only been used once or twice too! (thanx Amara! :) )
One of the colors I received was the awesome barbie pink, although i don't wear pink a lot, it is my FAVORITE kind of pink, and i am constantly looking for the perfect barbie pink. Anyways So i decided that I would make an ombre using a second barbie pink! (amazing) and a darker O.P.I. magenta for the tip! This is only my second or third time doing an ombre, an i almost wish it was a more drastic color fade, NEXT TIME.


For the base color I used NYX - flash, 3-4 coats, its a dusty pink creme, that looks super plastic-like on, (i mean that in a good way, of course.) Next using a makeup sponge I added Anise - a bud for you, pink creme, also super fake looking, and really bright. I love this color! Last for the darkest part of the color fade, on the tip, i used O.P.I. - jewel of india, magenta jelly, with a really nice luster.
With the dotting tools my sister got me for christmas, I made my polka dots using Nail Star - white! 
I guess i was feeling girly today?!

thanx for stopping by.

December 18, 2011

24 days of XMAS Challenge : Day 18

❄❇❅❆✺❃❉❄❇❅❆✺❃❉❄❇❅❆✺❃❉❄❇❅❆✺❃❉❄❇❅❆✺❃❉
Here are my STOCKING themed nails, day 18 or the 24 day XMAS CHALLENGE! (WOAH!)
The thing i love most about christmas stockings ( other than their contents!!) is the different fabrics and patterns they are made of. I focused on the funky mix of different flannel fabrics that are commonly seen on homemade stockings. 


Starting with the thumb i used O.P.I. - jade is the new black as the base color, then created a plaid pattern using Nail Star - medium metallic green  and Nail Star - white (#108).   I then wanted to include a 3D element without having to use something 3D, so I painted on a button using Love & Beauty - gold,  Nail Star - white (#108) for the highlight and Nail Star - black (#109) for the shadow and center.


The red nail was done using Chanel - laque rouge base 2 coats with Kiss - gold striper swirls.
The middle finger has a base coat of Ruby Kisses - french white, 3 coats, Nail Star - red  stripes, Nail Star - medium metallic green dots. The Ring finger was also done with 3 coats of Ruby Kisses - french white, the dots were done using Nail Star - black dots with Kiss - gold striper on top. Finally an outline of a heart was added using the same black.


The last nail was done using O.P.I. - jade is the new black  2 coats, with a white dot pattern done with Nail Star - white (#108)

i hope you like them :) 
Tomorrow is Santa Hats!


To see more STOCKING themed nails check out these ladies blogs:
Thanx for stopping by :)

❄
❇❅❆✺❃❉❄❇❅❆✺❃❉❄❇❅❆✺❃❉❄❇❅❆✺❃❉❄❇❅❆✺❃❉

December 11, 2011

24 days of XMAS Challenge : Day 11

❄❇❅❆✺❃❉❄❇❅❆✺❃❉❄❇❅❆✺❃❉❄❇❅❆✺❃❉❄❇❅❆✺❃❉
Christmas movies are one of the best parts of waiting for the big holiday day. Now one of my favorite holiday movies is Nightmare Before Christmas. Its so silly and imaginative, and one of the best parts, i can watch from halloween to christmas and its still so fitting. 
So how does this relate to my theme today? Well, if you've seen this movie before you'll probably recognize the scene i am depicting. When Jack Skelington takes on christmas he makes several stops on his route, one of them is at an old women's house. He opens the door an places what seems at first to be a harmless wreath... until like all of the haunted holiday toys it comes alive and starts to attack!. This scene is so ridiculous and playful and well depicts how twisted this holiday can be when not even an old women nor a wreath are safe from the handy work and fantastical minds of Henry Selick and Tim Burton.


I didn't want to white for the background because i thought it would make it more graphic looking and as your know its stop motion which means its built scenes using puppets and props. SO...
I used two coats of Sally Hansen - shell we dance (#160) which allows my natural nail to be scene so the design really stands off my nail. 
To make the wreath i started with my middle finger so i could determine where the arms of the wreath were going to move. So first i used L.A. Girl FLARE - hunter green, I sort of stippled a leafy wreath pattern i a circle then moving towards opposite edges of my nails... and then continued this in a line across the rest of my nails. 
Next to get a little tonality i used Sinful Colors -HD nails (#926),  spaced out to  add to the leafy feeling.
Now to do the actual leaves I used Nail Star - medium metallic green in differently sized dots all on top of the green already down, but spaced enough where the individual leaves aren't touching, so that it looks like individual leaves. Then to add even further to the leaves I used Kiss - green striper. To accentuate the leaves EVEN MORE I used Kiss - black striper and made little squiggles on the wreath to separate the leaves, then did a little choppy outline under the top section to give the wreath looking like it has a mouth. 
The eyes were done with Nail Star - white and Nail Star - black.
 For the last touch of the wreath i used Kiss - bronze striper to create the little berries on the wreath. I used bronze so that they would recede into the wreath more when I added the bow.
The Bow was done using Kiss  - red striper, for the base color. Then for highlights I used Nail Star- red on the outside edge of each flap of the bow, a line or two down the center and on the hanging ribbon. Again, not completely covering up the back ground color and not touching other red sections so that it looks more 3D. 
Then Seche VITE - quick dry top coat.. DUH! :)

PHEW! Stay tunes because tomorrows theme is HOLLY

More holiday WREATH inspired nails can be seen HERE:
Thanx for stopping by :)

❄
❇❅❆✺❃❉❄❇❅❆✺❃❉❄❇❅❆✺❃❉❄❇❅❆✺❃❉❄❇❅❆✺❃❉

December 07, 2011

24 days of XMAS Challenge : Day 7

❄❇❅❆✺❃❉❄❇❅❆✺❃❉❄❇❅❆✺❃❉❄❇❅❆✺❃❉❄❇❅❆✺❃❉
GingerbreadMEN, that was the challenge for day 7
Originally I didn't want to do actual gingerbread men, i was looking more at gingerbread houses for inspiration, but i felt my design was missing something....
What I did was have a gingerbread background, and a ring of icing with red, yellow, orange, green and purple gumdrops.... this is the point at which the design felt empty.
The icing motifs included in the gum drop and icing rings are : gingerbread men,  a gingerbread house, spiral and heart! I wanted them to look like they were draw in icing and add to the already playful palette to give it that.... child like fancy? lol


The base color I used was Love & Beauty - cocoa (how appropriate for holiday related foods) i seriously can't say it enough... these nail polishes are SWEET, one coaters nice colors... more more more!
Next.. because alas i still have no dotting tool I used the end of a paint brush and made connecting dots in a ring around my nail, not too close to the edges though, using Ruby Kisses - french white.
For the colors i used Nail star - red, Nail star -  glittery orange,  Nail star - lime green, Nail star - dark purple, & Kiss - gold glitter stripper, and dotted the colors... gumdrops... randomly in the center of white... like gumdrops stuck on with icing. 
To fill the empty space of the design I used Ruby Kisses - french white for the drawings.
need i say it.... Seche Vite - quick dry top coat!

and there you have it, ginger things (title, maybe? ) Tomorrow is CANDY CANES

hungry for more gingerbread? check out these blogs!
Thanx for stopping by :)

❄
❇❅❆✺❃❉❄❇❅❆✺❃❉❄❇❅❆✺❃❉❄❇❅❆✺❃❉❄❇❅❆✺❃❉

December 04, 2011

24 days of XMAS Challenge : Day 4

❄❇❅❆✺❃❉❄❇❅❆✺❃❉❄❇❅❆✺❃❉❄❇❅❆✺❃❉❄❇❅❆✺❃❉
It's day 4 of the 24 day x-mas challenge, and todays theme is SNOWMAN (men) :)
I'm posting this on the early side because otherwise I wont be able to do my snowmen nails till late late tomorrow night, and I might as well make use of my night owl habits! As you will see, I was inspired by a still from Frosty The Snowman, although i kept to the traditional lump of coal and carrot face, the color background and framing are similar. I thought this was a perfect opportunity to use a base color other than blue, red and green, the typical December holiday palette, which so happen to be the three colors I were least often. I thought the thistle color was really pretty, but i wanted more contrast to make my snowmen POP! I also thought my snowmen should wear bow ties instead of scarves because i thought it would be cuter!

still from Frosty The Snowman (1969)


                                                 1                    2                   3                 4              5

Okay, first off (post B.C.) i used Love & Beauty - lavendar, the amazing thing about this, was, it was a one coater! unvelievable! I mean i know there are better nail polishes out there, but L&B seriously is one of my favorite brands, so cheap, nice colors, and not too thin! 
ANYWAYS... Next, for the snowmen: Ruby Kisses - french white, coal and hat Ruby Kisses - black eutopia,  carrot Love & Beauty - orange, shading on the carrot I mixed L&B- orange with Orly - bus stop crimson (weird name), and the highlights for the eyes, carrot and hat I mixed Ruby Kisses - french white with Ruby Kisses - black eutopia for various grey tones.

For each of the bow ties i wanted something different (it took every ounce of me to not just bedazzle the crap out of these little guys, can't over do it!) 
[1] Sally Hansen - cardinal, Love & Beauty - Mint (green glimmer), Ruby Kisses - french white, Ruby Kisses - black eutopia.
[2] Kiss - blue striper, Kiss - gold glitter striper, Ruby Kisses - black eutopia
[3] Orly - bus stop crimson,  Ruby Kisses - french white, NYC - starry silver glitter (#105)
[4] Ruby Kisses - french white, Ruby Kisses - black eutopia, L.A. Girls Flare - hunter green
last but not least...
[5] Sally Hansen - cardinal, Kiss - blue striper

All topped off with a nice HEALTHY coat of Seche VITE - quick dry top coat!  (the best!!!)

phew! well, i look froward to seeing the rest of the snowman challenge designs from the other ladies participating, and I hope you enjoyed mine too! :)

For more SNOWMAN themed nails be sure to check out:
Thanx for stopping by :)

❄
❇❅❆✺❃❉❄❇❅❆✺❃❉❄❇❅❆✺❃❉❄❇❅❆✺❃❉❄❇❅❆✺❃❉
December 01, 2011

24 days of XMAS Challenge : Day 1


❄
❇❅❆✺❃❉❄❇❅❆✺❃❉❄❇❅❆✺❃❉❄❇❅❆✺❃❉❄❇❅❆✺❃❉
hello hello hello,  i am very excited to be bringing to you my first post of my first challenge!
The December 1st (OMG can't believe December is here already! yikes!) manicure challenge theme is SNOWFALL!  Unfortunately it has been too warm where i am ( i'm talking light sweater- no jacket kind of warm,) which is unusual for this time of year, so we haven't yet had our first WINTER snow! (other than that freak snow storm during the last week of October.)


One of my absolute FAVORITE FAVORITE FAVORITE things about snow is the way it looks on the trees! it's absolutely beautiful! So, because i love, and long for that sight i decided it would be my NAILSPIRATION for challenge day #1.


For the base color I used O.P.I. - kyoto pearl which is absolutely gorgeous! it seriously makes your finger nails look like pearls! (it's hard to tell in these pics though, but if you haven't tried it i recommend it!)
for the shadows of the snow I used O.P.I. - lucern-tainly look marvelous, the branches are done with Kiss - bronze and red wine stripers, and for the snow I used Kiss - white striper. Finally I topped it off with my newly acquired Seche VITE - quick dry top coat, which is awesome!
I hope you enjoy the first installment to this nail challenge!

be sure to check out Nails and Stuff, obsessed with glitter, Paint that nail, Red hair and black nail polish, Ruby's Nails, Polish, Oh My! finger painted and starting a bit later in the challenge wickless and polished! for more festive nail creations!

thanx for stopping by :)

❄
❇❅❆✺❃❉❄❇❅❆✺❃❉❄❇❅❆✺❃❉❄❇❅❆✺❃❉❄❇❅❆✺❃❉

November 30, 2011

rock candy

For todays design I was inspired by the diamond shape! i decided to use a clear base which i just got today, and rainbow colors for the stones. I chose to draw them in a loose and pop-art -like style to add to the playfulness of design and color palette.
I  thought the clear base would create a stronger contrast between design and nail, as if it were floating. I also added some differently colored rhinestones to fill in some of the negative space.
Polishes used include 10 professional nail lacquer - perfectly clear (#401)  for my base, and  a variety of Kiss - stripers  in yellow, red, soft purple, soft green, red wine, orange and blue  for the gem stones and Kiss - stripers in white and black to accentuate the facets in the stones  while also adding a "drawn" like effect. :)

November 28, 2011

glitter globe

quick polish before bed. inspired by snow globes!

Colors include Sally Hansen complete salon manicure - shell we dance? (#160) for the base color and
Kiss - red striper  for the base of the globe. There are 4 types of glitter including super fine white and small hex white which are used for the snow and globe in the background, and small hex silver and large hex silver glitter for the larger/closer flakes. I also used silver nail art beads to emphasize the half moon which is the base of the snow globe... also because i am just obsessed with these beads!!!

November 27, 2011

long day!

Just spent all morning driving back from vermont and was in need of a pick me up. I was looking through my stash and realized i still haven't tried my Butter London - Rosie Lee that i picked up weeks ago!!! it's the most amazing pink glitter, seriously delicious looking... thus, the inspiration... cupcakes! this nail design includes pink glittery frosting, multicolor sprinkles all on top of soft spongey cake!
Due to the playful theme, and excessive decoration i thought the layout of the nails should remain on the tamer side. For the base color I used O.P.I. - bubble bath (3 coats), Kiss - white for the dots, Butter London -  Rosie Lee (3-4 coats) and of course, nail art beads (my new obsession!!)  adhered with O.P.I. - top coat.
these nails were super easy to do and other than dry time, which is always longer when using these nail art beads (better safe than sorry) the design does not take a long time to complete.
Now  that i am finished i am going to go look for something sweet to eat!  :)

November 25, 2011

THANKSGIVING part 2.

feast your eyes on more thanksgiving nail fun!


I went a little crazy with the theme, symbols included are maize, cornucopia (with fimo fruits :-)) and a hand-turkey, and two fingers (pinky and pointer) with random designs.
For the base coat i used O.P.I. -  designer... de better, for the designs i used mixed nail art beads, large glitter circles, and Nail Star pen & brush in yellow, bronze, gold and red to fill the beaded designs.
in case you want to attempt your own just know that doing just one hand took well over an hour, not including dry time!
Hope you all had a happy holiday
:)

November 23, 2011

THANKSGIVING

Now, i'm really not one for thanksgiving food. turkey makes you sleepy, stuffing is good as long as its meat-less, and potatoes... too starchy... but OMG.. PUMPKIN PIE IS MY JAM! esp. when homemade and fresh out of the oven! I drove up with my boyfriend to my sisters house in VT for this holiday and my sis spent all morning making pie! so until i get to indulge in my favorite turkey day food... i'll just have to settle with PUMPKIN PIE themed nails!!

In order to achieve this dessert design the colors you'll need are Sally Hansen Xtreme - crushed (#20)  for the pumpkin part of the pie (2 coats)
Love and Beauty - gold  for the crust (2 coats), Kiss - bronze striper for the tear drop holes in the crust.
Next you'll need decorative gold bead balls, to embellish the crust, which can be purchased online, and if you haven't used them before (which i hadn't before this) it can be quite tedious. The balls are adhered using top coat and after the design is complete you want to use another layer of top coat to secure the beads.
If you try any thanksgiving designs then SHARE IT!
and I hope you all have a happy holiday!!!

November 21, 2011

silver and gold leopard print

This is my first time ever doing leopard, and i don't think it's half bad! right?

I think you might see it as a theme for the next week or so because i had so much fun doing it!
After the O.P.I.- base coat, i used O.P.I.- bubble bath  for the base color, O.P.I.- designer...de better for the spots, Kiss-black striper for the outlines, Kiss- gold striper for highlighting the inside of the spots, and a sprinkling of martha stewart brand craft glitter followed by O.P.I.- top coat.


November 17, 2011

a penny for your thoughts

my day was kind of tricky, filled with little inconveniences that amounted to more. its one of those days where you go... i had all the time in the world. (its called procrastination)  today i FINALLY decided to do what i've been putting off and some freak thing comes along, preventing me from doing whatever I have been putting off.
SOOOO... In hopes of altering my luck i decided lucky penny inspired nail art might help counter my misfortunes.


Love and Beauty- "rust"
black and white striper

November 13, 2011

Garden Party

I've been thinking about what would make for an interesting nail pattern, answer; WALLPAPER.  I checked the internet for a while until i found a few that i liked then interpreted the pattern into my own designs. the first three are examples of the wall paper designs. The index finger is a impressionist garden scene and the pinky well...it was almost 2 in the morning at the point and... accidents happen?!
This is the impressionist garden


1-3 has a base of "all hail to the queen"- butter
followed by mixed colors and glitters. #3 also has a purple flower shaped rhinestone cabochon, just for fun. #4 uses a clear base coat, but a soft creme or pink color would work just as well. Generally for all of the flower vines i used a range of greens blacks and grays to create a little depth. The flowers can be whatever color you want, i stuck to no more than 3 base colors for the flowers so that it maintained that bouquet // wallpaper feeling.  The flower petal accents range from the color of the base flower, to blacks, complimentary colors and whites. These nails are not intended to be worn together, because it tends to look to chaotic with so many different patterns, but are done so just to show some of the flower variations.