Showing posts with label floral. Show all posts

November 18, 2012


GARDEN PARTY


Yet another manicure for my boyfriends mom! She loves flowers and hummingbirds so she got a full blown garden mani! this is one of the craziest and most intense manicures i have ever attempted and  it took about 6 hours... she is the most patient person i have ever met! lol

The base color is O.P.I.- bubble bath
The design was made using a mixture of acrylic paint, gouache paint and nail polish and loose glitter
Sinful colors - pearl harbor was used over the design to add even more sparkle
seche vite as always to top off and seal the many many layers


February 04, 2012

anti-vday

nails for a (hypothetical) broken heart


Love & Beauty - lime, O.P.I. - who the shrek are you?, Layla Magneffect - velvet groove, Ruby Kisses - french white, Revlon - gold coin (#925),  pink and magenta nail art beads and purple rhinestone cabochons. Topped off with Seche Vite -  fast dry top coat.

January 29, 2012

Robert Cavalli inspired nails

 Got more baggage... inspired by Roberto Cavalli bag from the spring 2012 collection


base color 3 coats O.P.I. - kyoto pearl, Nail Star - black for the stripes and flower outline.
Nail Star - white for the base color of the flowers, and Love & Beauty - royal, L.A. girl F.L.A.R.E. and Love & Beauty - lavender. I finished the design off with Seche Vite - dry fast top coat.

January 12, 2012

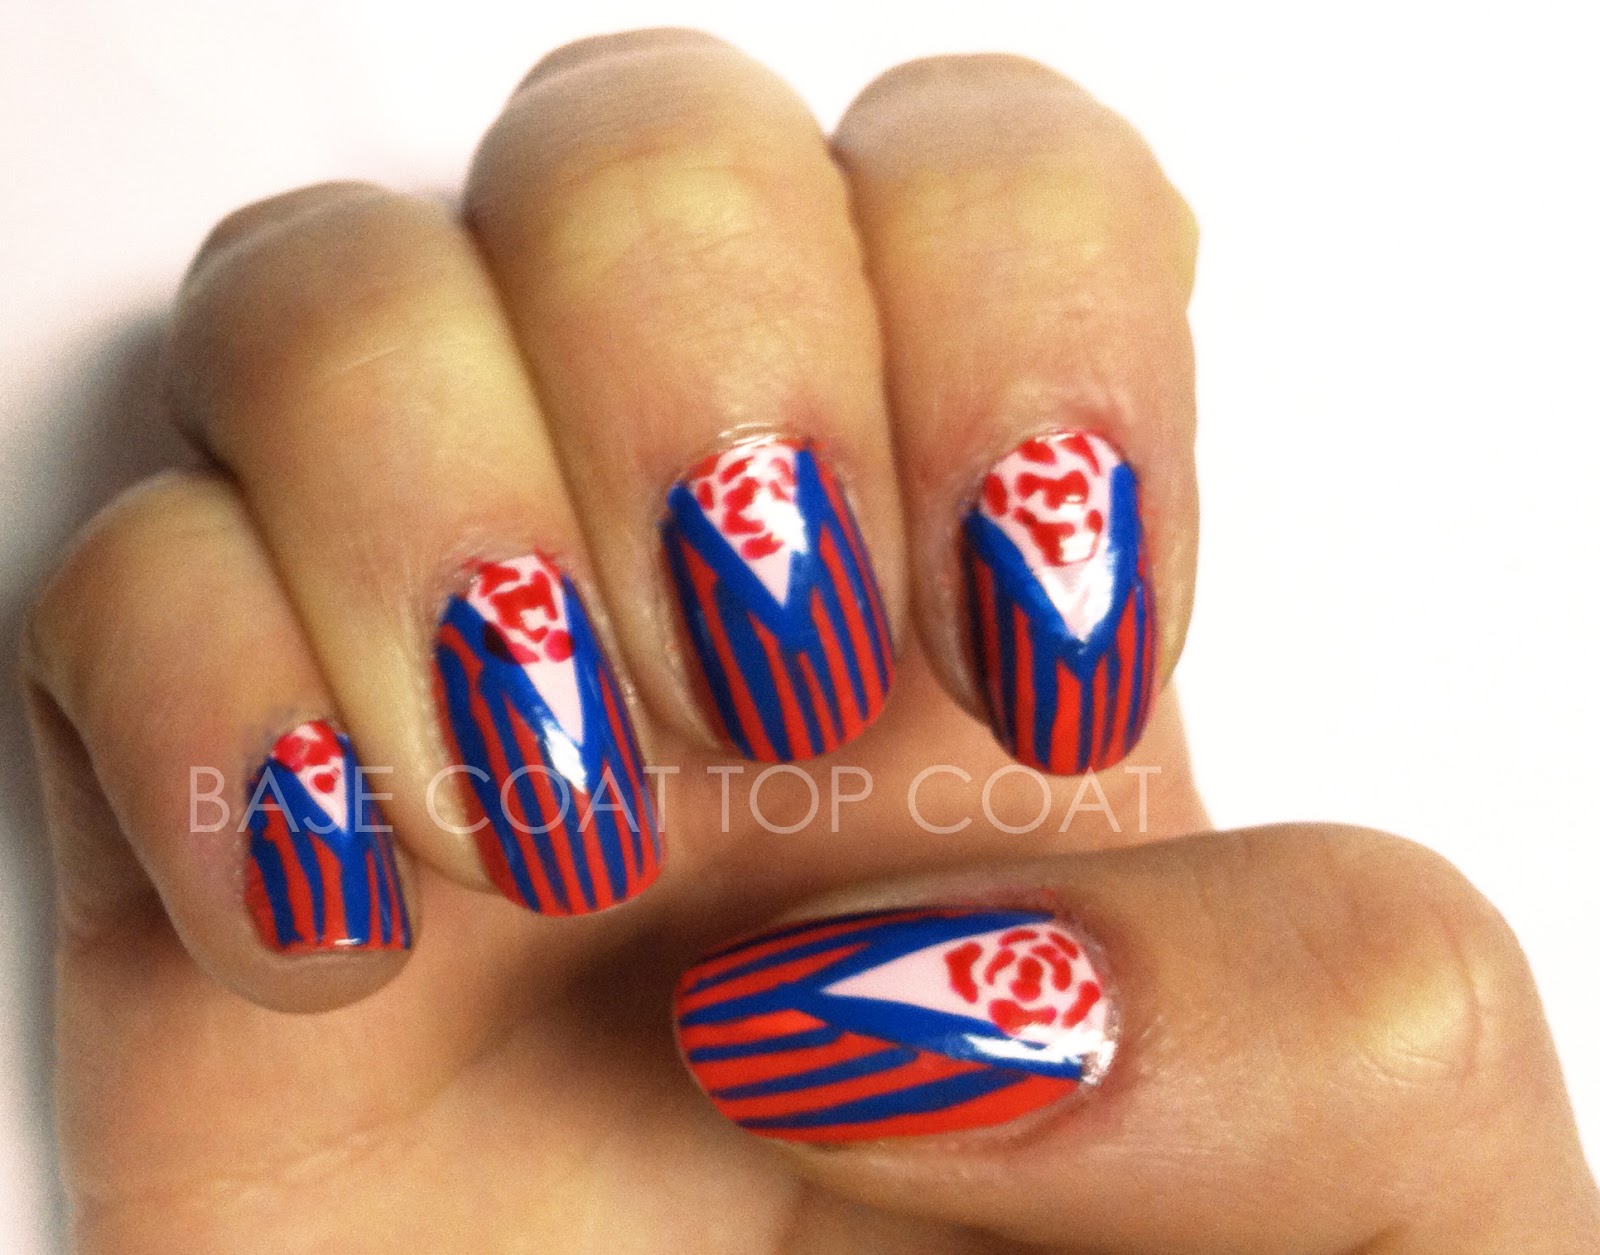
stripe suit

These nails were kind of a random thought. I knew i wanted to  have a pink v-gap with a flower inside, but the blue was chosen soley because red and blue are colors i rarely use together.  I decided that i would use the blue to subdue the intense coral color. I used the blue to outline the Vgap and then added vertical stripes over the coral which from a distance, makes it appear like a color fade from blue to purple to coral. Unfortunately the highlights of the nails are seriously distracting, sorry! and The baby pink triangle was chosen to offset the rest of the design and enhance the directionality of the nail through contrast in color.


The reddish color is Love & Beauty - coral, 3 coats. The baby pink vgap was done using American Apparel - coney island 1 coat. The blue stripes and outline was done using Kiss - blue striper,  and the rose is Nail Star - red.


kelly

December 14, 2011

24 days of XMAS Challenge : Day 13

I don't know why but i've gotten into this terrible habit of posting my nails in the wee hours of the morning despite my doing them early in the day, except last night i went to post them around midnight (not too late) and my internet crapped out before i could finish writing this post! >:( ANYWAYS here are my christmas tree inspired nails. I decided to avoid doing an actual christmas tree because tomorrow is ornaments and i may or may not do something with that. So instead I went for a two color, christmas sweater pattern. The thumb and ring finger are supposed to look like more christmas trees in the background, but it kind of just looks like mountains, which I am okay with too.


So first I painted all but one nail using Love & Beauty - mint and one nail with L.A. Girl Flare - hunter green. Next i figured out which of the mint nails I wanted as the "tree farm/mountains"
After that it just took A LOT of patience to get the straight lines. 
Next I used to different sized gold rhinestone cabochons, the taller trees with the larger, and the smaller with ...the smaller, in place of the stars. 
SECHE VITE!

Anyways here is my CHRISTMAS TREE DESIGN! stay tuned because tomorrows theme of the 24 day x-mas challenge is ORNAMENTS!

To see more CHRISTMAS TREE nails check out these ladies blogs:
Thanx for stopping by :)

December 13, 2011

24 days of XMAS Challenge : Day 12


Hey everyone! So i finished these a few hours ago but had some things to do. so here they are now, my HOLLY themed nails.. day 12 of the 24 days of xmas challenge! What I wanted for this challenge, was have a sort wallpaper effect. I used muted red and green and a white to add to the wallpaper feel,  with interchangeable white, red, silver and gold for the holly, and as you can see a gestural as opposed to tight holly print. And decided to add to it even further and making it a patterned/embellished gold tip french. 
I also included a picture of the nail plate i made which i used to figure out which colors to use


The base colors I used were Ruby Kisses - french white, Love & Beauty - mint and American Apparel - coney island. 
The holly on the white nail i used Kiss - gold glitter striper,  and Nail Star - red opaque, On the mint nail I used Nail Star - opaque silver (#114) Nail Star - red, and for the pink i used Nail Star - white 108 and Nail Star - opaque red again. 
Next I added a line of auburn nail art beads, and then filled in the space between the nail art beads to the top of my nail with Kiss - gold glitter striper... Seche Vite

If you'd like to know which colors i used for a specific nail on the holly wheel, then let me know!

Stay tuned for tomorrows nail art themed CHRISTMAS TREES!

To see a tutorial for this design visit the TUTORIAL PAGE.

More boughs of HOLLY nails can be seen HERE:
Thanx for stopping by :)

December 11, 2011

24 days of XMAS Challenge : Day 11


Christmas movies are one of the best parts of waiting for the big holiday day. Now one of my favorite holiday movies is Nightmare Before Christmas. Its so silly and imaginative, and one of the best parts, i can watch from halloween to christmas and its still so fitting. 
So how does this relate to my theme today? Well, if you've seen this movie before you'll probably recognize the scene i am depicting. When Jack Skelington takes on christmas he makes several stops on his route, one of them is at an old women's house. He opens the door an places what seems at first to be a harmless wreath... until like all of the haunted holiday toys it comes alive and starts to attack!. This scene is so ridiculous and playful and well depicts how twisted this holiday can be when not even an old women nor a wreath are safe from the handy work and fantastical minds of Henry Selick and Tim Burton.


I didn't want to white for the background because i thought it would make it more graphic looking and as your know its stop motion which means its built scenes using puppets and props. SO...
I used two coats of Sally Hansen - shell we dance (#160) which allows my natural nail to be scene so the design really stands off my nail. 
To make the wreath i started with my middle finger so i could determine where the arms of the wreath were going to move. So first i used L.A. Girl FLARE - hunter green, I sort of stippled a leafy wreath pattern i a circle then moving towards opposite edges of my nails... and then continued this in a line across the rest of my nails. 
Next to get a little tonality i used Sinful Colors -HD nails (#926),  spaced out to  add to the leafy feeling.
Now to do the actual leaves I used Nail Star - medium metallic green in differently sized dots all on top of the green already down, but spaced enough where the individual leaves aren't touching, so that it looks like individual leaves. Then to add even further to the leaves I used Kiss - green striper. To accentuate the leaves EVEN MORE I used Kiss - black striper and made little squiggles on the wreath to separate the leaves, then did a little choppy outline under the top section to give the wreath looking like it has a mouth. 
The eyes were done with Nail Star - white and Nail Star - black.
 For the last touch of the wreath i used Kiss - bronze striper to create the little berries on the wreath. I used bronze so that they would recede into the wreath more when I added the bow.
The Bow was done using Kiss  - red striper, for the base color. Then for highlights I used Nail Star- red on the outside edge of each flap of the bow, a line or two down the center and on the hanging ribbon. Again, not completely covering up the back ground color and not touching other red sections so that it looks more 3D. 
Then Seche VITE - quick dry top coat.. DUH! :)

PHEW! Stay tunes because tomorrows theme is HOLLY

More holiday WREATH inspired nails can be seen HERE:
Thanx for stopping by :)

24 days of XMAS Challenge : Day 10


Hello, so i'm posting my day 10 late because I spent yesterday traveling to my parents house and was too tired to post my pictures last night. I was inspired by the variety of colors that the poinsettia flower comes in. I also just received my Layla Magneffect - velvet groove (#08) so i wanted to incorporate the color as well as take advantage of the magnetic pull you can get, which would cater to separating the petals. This was my first time using it so it wasn't as successful as i had hoped, but i think it still go the look across.


The base color is Butter london - all hail the queen, the dark purple flowers were done using Layla Magneffect - velvet groove (#08) The red is Revlon - revlon red (#680), the pink were done with O.P.I.- bubble bath, Nail Star - baby pink.
the green leaves were done using Nail Star - dark green glitter, and then for the center of the flowers i placed three gold rhinestone cabochons. Then Seche VITE - quick dry top coat.

More POINSETTIA nails can be seen HERE:
Thanx for stopping by :)


December 01, 2011

24 days of XMAS Challenge : Day 1


hello hello hello,  i am very excited to be bringing to you my first post of my first challenge!
The December 1st (OMG can't believe December is here already! yikes!) manicure challenge theme is SNOWFALL!  Unfortunately it has been too warm where i am ( i'm talking light sweater- no jacket kind of warm,) which is unusual for this time of year, so we haven't yet had our first WINTER snow! (other than that freak snow storm during the last week of October.)


One of my absolute FAVORITE FAVORITE FAVORITE things about snow is the way it looks on the trees! it's absolutely beautiful! So, because i love, and long for that sight i decided it would be my NAILSPIRATION for challenge day #1.


For the base color I used O.P.I. - kyoto pearl which is absolutely gorgeous! it seriously makes your finger nails look like pearls! (it's hard to tell in these pics though, but if you haven't tried it i recommend it!)
for the shadows of the snow I used O.P.I. - lucern-tainly look marvelous, the branches are done with Kiss - bronze and red wine stripers, and for the snow I used Kiss - white striper. Finally I topped it off with my newly acquired Seche VITE - quick dry top coat, which is awesome!
I hope you enjoy the first installment to this nail challenge!

be sure to check out Nails and Stuffobsessed with glitterPaint that nailRed hair and black nail polishRuby's NailsPolish, Oh My! finger painted and starting a bit later in the challenge wickless and polished! for more festive nail creations!

thanx for stopping by :)

November 13, 2011

Garden Party

I've been thinking about what would make for an interesting nail pattern, answer; WALLPAPER.  I checked the internet for a while until i found a few that i liked then interpreted the pattern into my own designs. the first three are examples of the wall paper designs. The index finger is a impressionist garden scene and the pinky well...it was almost 2 in the morning at the point and... accidents happen?!
This is the impressionist garden


1-3 has a base of "all hail to the queen"- butter
followed by mixed colors and glitters. #3 also has a purple flower shaped rhinestone cabochon, just for fun. #4 uses a clear base coat, but a soft creme or pink color would work just as well. Generally for all of the flower vines i used a range of greens blacks and grays to create a little depth. The flowers can be whatever color you want, i stuck to no more than 3 base colors for the flowers so that it maintained that bouquet // wallpaper feeling.  The flower petal accents range from the color of the base flower, to blacks, complimentary colors and whites. These nails are not intended to be worn together, because it tends to look to chaotic with so many different patterns, but are done so just to show some of the flower variations.

November 12, 2011

victorian daisies // midnight

Midnight daisies was a fun little experiment using 3 colors gradient base, glitter striper, white striper and football shaped white and baby blue rhinestone cabochons.
my gradient consists of
"grey"-love and beauty
"indigo"-love and beauty
"royal" love and beauty
i actually really love this line of nail polishes, their colors aren't too diluted so you never need more than two coats to get a fully opaque coat. They also don't take too long to dry and are under $3.00 a bottle!
The next step involves using a gold glitter striper, drawing a horizontal line that seperates the grey from the blue tones. Next you'll want to place the football shaped cabochons starting on top of the gold stripe. I used white for stones for my index, middle and pointer fingers in a line, and alternated blue and white on my pinkies and thumbs.
For the Final step you will need a white striper. first on the tip of your finger nail make little dashes that point either left or right depending on the curve of your cabochon. next make dashes around the rhinestone that is on top of the gold stripe only (this should be be the one furthest from the tip of you nail). Finally  make 3 dashes in the center along the rim where the cuticle grows,  this should connect but not touch the "flower petals" from the rhinestone daisy, creating a victorian inspired floral pattern.