Showing posts with label frenchy. Show all posts

December 28, 2011

Tutorials

Hello all,


Three tutorials are now available for trying out on my TUTORIAL PAGE!


If you try any of these I would love to see images of your results! and I ask that you credit and link back to me!


December 19, 2011

24 days of XMAS Challenge : Day 19

❄❇❅❆✺❃❉❄❇❅❆✺❃❉❄❇❅❆✺❃❉❄❇❅❆✺❃❉❄❇❅❆✺❃❉
Another "nouveau" french design mixed with the 1/2 moon, for day 19 of the 24 day challenge! The theme for today was SANTA HATS, and there were 3 elements i wanted to include fur trim, ball tassel and bells (but in this case, gold nail art beads)


The base coat was done using O.P.I. - i'm not really a waitress, 2 coats
The 1/2 moon and french tip were done with 2 coats of O.P.I. - kyoto pearl, next i put the glitter down over the white parts, but because the red is so powerful and the kyoto is so sheer the snow has a pink tint. The glitter I used is a iridescent white micro glitter which catches the light adding specks of greens and pinks. Next I created a window pattern on the red with gold beads for the "bells," finally a heavy coat of Seche VITE - quick dry top coat


Tomorrow is SLEIGH/SLED themed!


To see more SANTA HATS check out these ladies blogs:

❄❇❅❆✺❃❉❄❇❅❆✺❃❉❄❇❅❆✺❃❉❄❇❅❆✺❃❉❄❇❅❆✺❃❉

December 18, 2011

24 days of XMAS Challenge : Day 17

❄❇❅❆✺❃❉❄❇❅❆✺❃❉❄❇❅❆✺❃❉❄❇❅❆✺❃❉❄❇❅❆✺❃❉
Hello hello hello. 

sorry this is a late post. These are my nails from yesterday, I did these then i painted my moms nails for a christmas party and so I became lazy... SO, NOW...here is day 17 of the 24 day challenge! The theme was TINSEL!
I wanted to keep this simple (again) so i did a nouveau french! I incorporated real tinsel, beads and tinsel like glitter polish!


The holo bar glitter tinsel-like base was done using Love & Beauty - black/silver, 3 coats. The one thing i dislike about Love & Beauty nail polish is the naming issue. It's an issue because they name all their colors the same... i.e. al greens are green all reds are reds. RARELY do they name the actual color like lavender or mint, but they seriously need to be a little more creative, a little more descriptive or at the vary least put a freakin' number! For the sake of better description lets just call it black/ holo tinsel! jeeeze :)

ANYWAYS.... next i put a single layer of Sally Hansen X - in the spotlight (#35) which is a clear nail polish with slightly larger and less tinsel per coat, just to add a little size variation.

For the embellishment I used a single strip of real tinsel (from the little bundle in my hand) on the tips of my nails to make it a "french".  Finally i added silver nail art beads in a windowed arrangement to accentuate the silver strip and give it a little more flare.

i'll be posting todays theme a little later, which is STOCKINGS!

want more TINSEL? check out these ladies blogs:
Thanx for stopping by :)

❄
❇❅❆✺❃❉❄❇❅❆✺❃❉❄❇❅❆✺❃❉❄❇❅❆✺❃❉❄❇❅❆✺❃❉


December 15, 2011

24 days of XMAS Challenge : Day 15

❄❇❅❆✺❃❉❄❇❅❆✺❃❉❄❇❅❆✺❃❉❄❇❅❆✺❃❉❄❇❅❆✺❃❉
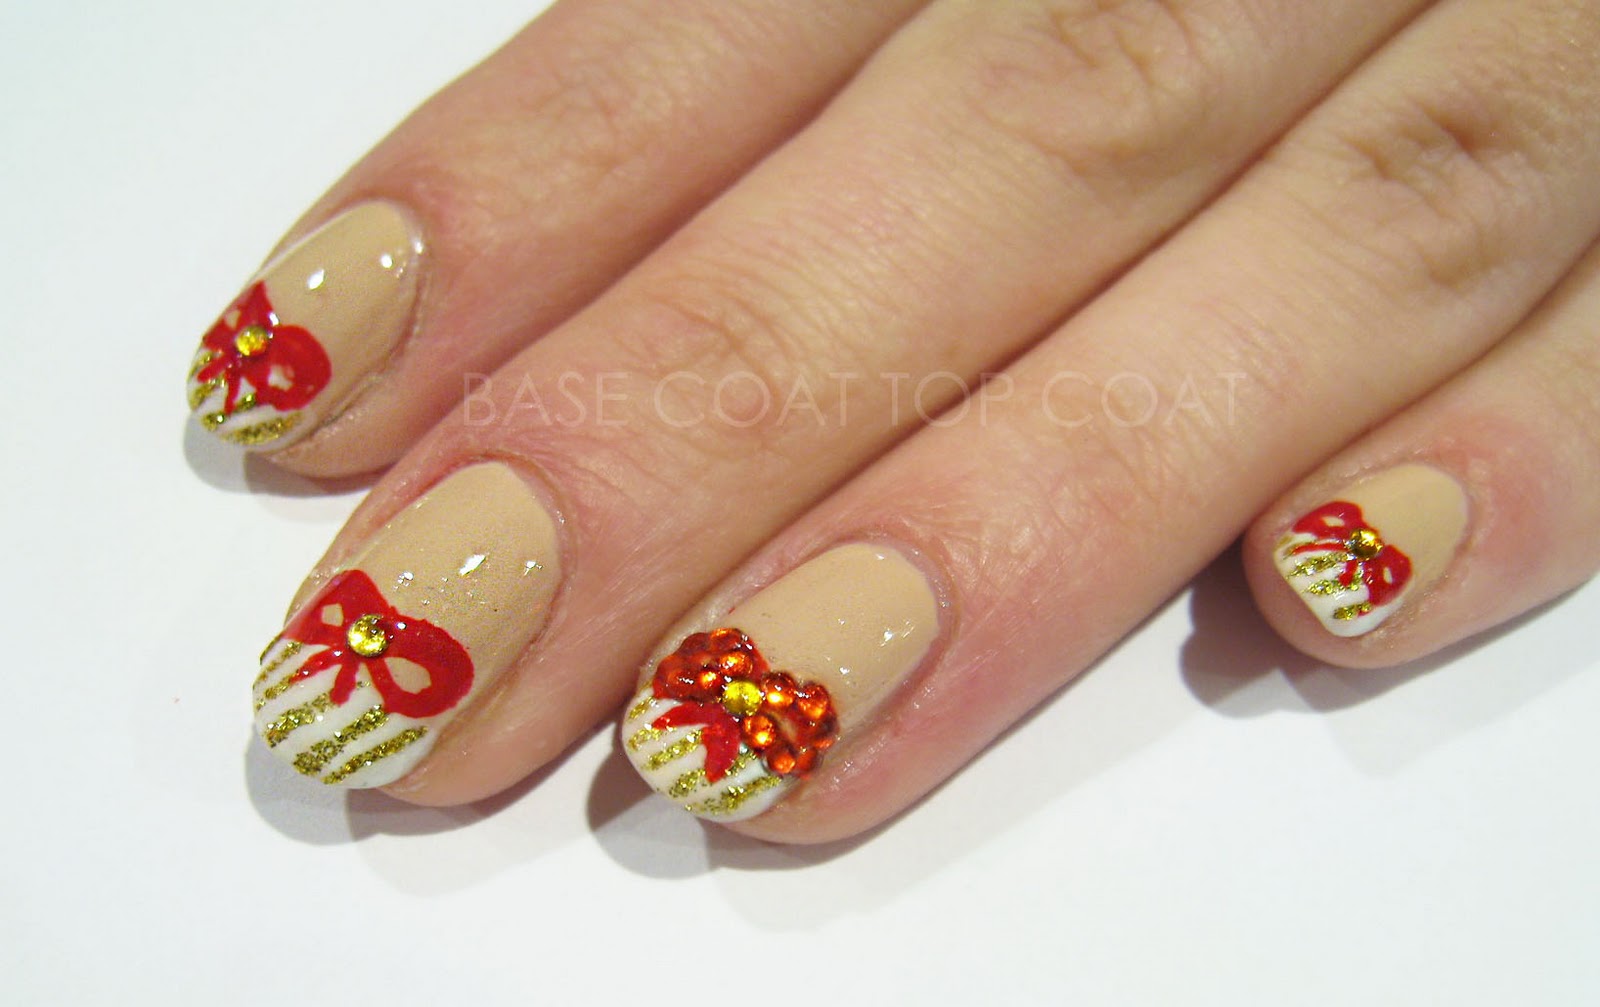
Day 15, can't believe it! Todays theme of the 24 day challenge is PRESENTS!
After yesterdays ornaments I decided to stay simple and keep to a classic design... the french!
I didn't want to use a typical sheer or pale pink base like i have been doing for this challenge but still wanted it to look neutral.


For the base I used Urban Outfitters - nude 5 2 coats. The french tip was done using Ruby Kisses - french white 2 coats. Stripes were done using Kiss - gold glitter striper two coats. Red bows were done using Kiss - red striper. Then to add my favorite thing... BLING I went over the bows on the thumb and ring finger with red rhinestone cabochons and in the center of all the bows are gold rhinestone cabochons, then finally Seche VITE - quick dry top coat.

Stay tuned because tomorrows theme is LIGHTS!

want more PRESENTS
 check out these ladies blogs:
Thanx for stopping by :)

❄
❇❅❆✺❃❉❄❇❅❆✺❃❉❄❇❅❆✺❃❉❄❇❅❆✺❃❉❄❇❅❆✺❃❉


December 13, 2011

24 days of XMAS Challenge : Day 12

❄❇❅❆✺❃❉❄❇❅❆✺❃❉❄❇❅❆✺❃❉❄❇❅❆✺❃❉❄❇❅❆✺❃❉
Hey everyone! So i finished these a few hours ago but had some things to do. so here they are now, my HOLLY themed nails.. day 12 of the 24 days of xmas challenge! What I wanted for this challenge, was have a sort wallpaper effect. I used muted red and green and a white to add to the wallpaper feel,  with interchangeable white, red, silver and gold for the holly, and as you can see a gestural as opposed to tight holly print. And decided to add to it even further and making it a patterned/embellished gold tip french. 
I also included a picture of the nail plate i made which i used to figure out which colors to use


The base colors I used were Ruby Kisses - french white, Love & Beauty - mint and American Apparel - coney island. 
The holly on the white nail i used Kiss - gold glitter striper,  and Nail Star - red opaque, On the mint nail I used Nail Star - opaque silver (#114) Nail Star - red, and for the pink i used Nail Star - white 108 and Nail Star - opaque red again. 
Next I added a line of auburn nail art beads, and then filled in the space between the nail art beads to the top of my nail with Kiss - gold glitter striper... Seche Vite

If you'd like to know which colors i used for a specific nail on the holly wheel, then let me know!

Stay tuned for tomorrows nail art themed CHRISTMAS TREES!

To see a tutorial for this design visit the TUTORIAL PAGE.

More boughs of HOLLY nails can be seen HERE:
Thanx for stopping by :)

❄
❇❅❆✺❃❉❄❇❅❆✺❃❉❄❇❅❆✺❃❉❄❇❅❆✺❃❉❄❇❅❆✺❃❉

December 03, 2011

24 days of XMAS Challenge : Day 3

❄❇❅❆✺❃❉❄❇❅❆✺❃❉❄❇❅❆✺❃❉❄❇❅❆✺❃❉❄❇❅❆✺❃❉
hello! :) Here is my ICICLES themed nail design! I did these nails when i was still up at 3am because i love this challenge, and unfortunately i have been busy bus busy so i've been waiting to post all day! SO, FINALLY here it is... I got my inspiration from ice caves particularly THIS IMAGE. I love the way the icicles look layered with all the different shades of blue! I however avoided the blue palette because I used blue as my primary nail color for yesterdays challenge. 


Starting after the base coat: 3 layers of Sinful - out of this world (#842) for the base and distant icicles (you can only really see it where it's that light grey under the whiter icicles. Next was actually a happy mistake, i kind of made a franken finger! It happened by first putting down a layer of O.P.I. - austin-tacious turquoise, only to decide it really was TOO turquoisey for what i wanted, so I put a layer of O.P.I. - lucern- tainly look marverlous on top. For some reason the turquoise pigment overpowered the steel grey glitter and created this deep grey-green. WEIRD! This was to  make the back shadowy part of the cave. Next I needed to make MORE ICICLES, but not completely cover up the silver section by using Kiss - white striper.  At this point I used my Seche VITE - quick dry top coat because I needed to do some finishing touches that top coat would only cover up. 
If you have been following me thus far you have probably realized that i REALLY like using rhinestones, glitter and such, and luckily i have the PERFECT thing for the holidays (which in order to not wear out i shall try to use sparingly... maybe?!) white powdery snow-like glitter!
I used a light sprinkling on the tip (its kind of hard to see because i don't have a nice camera), and topped off the design with a silver rhinestone on my ring finger and thumb.  If you check out the little oval nail swatch you can see the glitter better!

I FORGOT TO MENTION! I also used individual pieces of silver bar glitter to seperate the silver (sinful colors) and the grey/green, because its nearly impossible to see in these pics! 

Be sure to check out more ICEY nail designs at

thanx for stopping by :)

❄
❇❅❆✺❃❉❄❇❅❆✺❃❉❄❇❅❆✺❃❉❄❇❅❆✺❃❉❄❇❅❆✺❃❉

November 23, 2011

THANKSGIVING

Now, i'm really not one for thanksgiving food. turkey makes you sleepy, stuffing is good as long as its meat-less, and potatoes... too starchy... but OMG.. PUMPKIN PIE IS MY JAM! esp. when homemade and fresh out of the oven! I drove up with my boyfriend to my sisters house in VT for this holiday and my sis spent all morning making pie! so until i get to indulge in my favorite turkey day food... i'll just have to settle with PUMPKIN PIE themed nails!!

In order to achieve this dessert design the colors you'll need are Sally Hansen Xtreme - crushed (#20)  for the pumpkin part of the pie (2 coats)
Love and Beauty - gold  for the crust (2 coats), Kiss - bronze striper for the tear drop holes in the crust.
Next you'll need decorative gold bead balls, to embellish the crust, which can be purchased online, and if you haven't used them before (which i hadn't before this) it can be quite tedious. The balls are adhered using top coat and after the design is complete you want to use another layer of top coat to secure the beads.
If you try any thanksgiving designs then SHARE IT!
and I hope you all have a happy holiday!!!