Showing posts with label blue. Show all posts

January 29, 2012

Robert Cavalli inspired nails

 Got more baggage... inspired by Roberto Cavalli bag from the spring 2012 collection


base color 3 coats O.P.I. - kyoto pearl, Nail Star - black for the stripes and flower outline.
Nail Star - white for the base color of the flowers, and Love & Beauty - royal, L.A. girl F.L.A.R.E. and Love & Beauty - lavender. I finished the design off with Seche Vite - dry fast top coat.

January 25, 2012

BLING BLUE!

I've been really into layering embellishments over patterns lately...


For the base color i used Revlon - midnight affair (#791), the leopard was done using Nail Star - pearl blue and Kiss - blue striper. I then used Seche VITE to seal the design. Next I placed the rhinestone cabochons and created false settings around them using gold nail art beads. 

January 16, 2012

teal tie-dye

For this design I wanted to create a sort of died fabric effect using this awesome TEAL color I just received from a friend. All this requires is a base color and a minimum of 3 striper polishes, or 3 colors and thin brush to get this look. Because I was using a green-teal base I chose colors that I felt would compliment but not overpower the base.


After O.P.I. - natural nail base coat I applied 3 layers Milani - fresh teal  Next I used Kiss- blue striper to start the dyed pattern, I choose this color because It was similar to the teal, and tied the teal and the rest of the palette together. Next, keeping in mind that I just used blue, I choose Kiss - soft purple striper and followed along the outside of the blue patter. I then did the same with my final color Kiss - red wine striper outside the light purple. I then used 1-2 coats of Seche VITE - fast dry top coat.

January 12, 2012

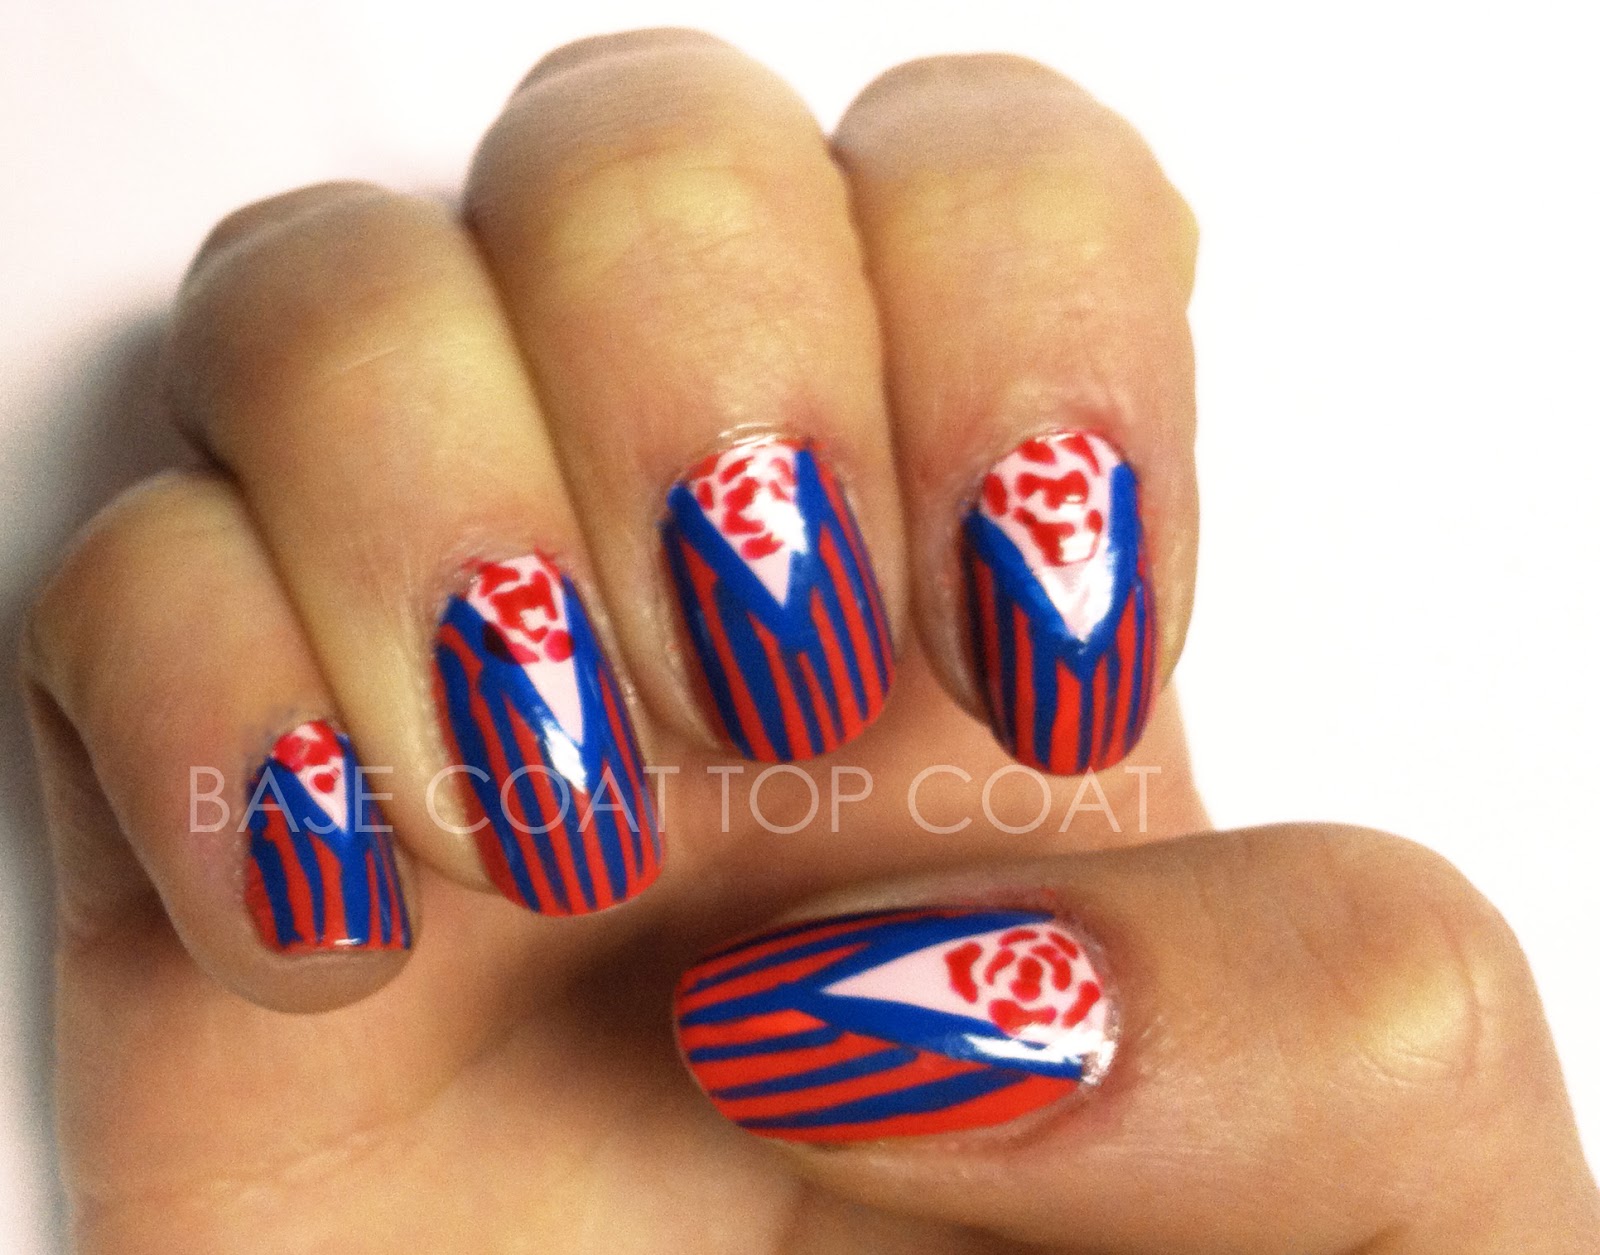
stripe suit

These nails were kind of a random thought. I knew i wanted to  have a pink v-gap with a flower inside, but the blue was chosen soley because red and blue are colors i rarely use together.  I decided that i would use the blue to subdue the intense coral color. I used the blue to outline the Vgap and then added vertical stripes over the coral which from a distance, makes it appear like a color fade from blue to purple to coral. Unfortunately the highlights of the nails are seriously distracting, sorry! and The baby pink triangle was chosen to offset the rest of the design and enhance the directionality of the nail through contrast in color.


The reddish color is Love & Beauty - coral, 3 coats. The baby pink vgap was done using American Apparel - coney island 1 coat. The blue stripes and outline was done using Kiss - blue striper,  and the rose is Nail Star - red.


kelly

December 29, 2011

Review

Review on Martha Stewart Halloween Glitter/Glue 6pk.


So I bought these glitters actually in August of this past year, and have become obsessed with her glitters ever since!
Now as you probably know her glitters are priced on the higher range of craft glitter, but let me tell you, THEY ARE WORTH IT!

The quality of the glitter is outstanding, and if you love glitter as much as i do her colors are DELICIOUS and her packaging i super clean too!
 This pack of glitter comes in black, silver, red, green, blue and orange, colors which are perfect for the halloween/fall season.
They are super fine and loose so the glitter never gets sticky and clump together.
Perfect for a light dusting as well as creating a super metallic surface that goes on smooth and clean no matter how many layers. The viles of glitter are generous, depending of course how often you glitter, but mine are still half way full after 4 months!

Note: The only problem with using a lot of layers of glitter both loose and polish is that you need to be prepared to scrub harder when removing it!!

One of the most important things about using any sort of embellishment whether it be craft glitter or micro beads is how the colors hold, and Martha Stewart glitters deliver! Some glitters bleed into nail polish or when your at the end of manicure and it bleeds when putting on top coat... that's the worst!
However I have found that Seche Vite - fast dry top coat is less likely to cause bleeding, and O.P.I.- top coat almost always makes poorly dyed embellishments bleed, which can ruin the design!

Now as far as the glue is concerned I haven't used it, but I'm confident it is more than adequate for crafting on paper and such, but obviously not meant for nails.

All in all if you see Martha Stewart in a craft store next fall I highly recommend buying it! you will not be disappointed! This specific 6 pack of colored glitter is seasonal, however there are other color combos offered all through out the year.

You can buy the 6 pack of martha stewart glitters at Michaels, Jo Ann fabric and crafts, and other craft stores, or online HERE

December 21, 2011

24 days of XMAS Challenge : Day 20

❄❇❅❆✺❃❉❄❇❅❆✺❃❉❄❇❅❆✺❃❉❄❇❅❆✺❃❉❄❇❅❆✺❃❉
FOUR DAYS LEFT! CRAZZZYYYY! 


SLEIGH/SLED was the theme for today! I chose to do santa's sleigh, reindeer flying over the moon. :)
I used a mix of nail polish and acrylic paint which allowed for a much smoother (less sticky) application of my design.


The color fade background was done using a base of Sally Hansen - marine scene (#23), 3 coats, and acrylic paint.  On top of that I used NYC - starry silver glitter (#105) which has a nice mix of silver and iridescent micro glitter mixed with medium sized hexagonal blue and pink glitter in a clear polish... It's really pretty! For the design I used all acrylic paint, and then sealed it with the amazing Seche VITE - quick dry top coat.


Tomorrows theme is REINDEER


To see more SLEIGH/SLED themed nails check out these ladies blogs:

❄❇❅❆✺❃❉❄❇❅❆✺❃❉❄❇❅❆✺❃❉❄❇❅❆✺❃❉❄❇❅❆✺❃❉

December 14, 2011

24 days of XMAS Challenge : Day 14

❄❇❅❆✺❃❉❄❇❅❆✺❃❉❄❇❅❆✺❃❉❄❇❅❆✺❃❉❄❇❅❆✺❃❉
A few days ago my parents, my boyfriend and I decorated the christmas tree! As I unwrapped the ornaments I was flooded with memories. Memories of being a kid and LOVING how some said my name, some i made, some that were my grandmothers, and some that have been on the tree for as long as I can remember. It was nice to see the ornaments that i remember from my youth, as well as a few new ones that I decided for todays challenge, with the theme ORNAMENTS I would look at and recreate some of the ornaments from the tree! Now because my nails are not as big as i want, and my design included other elements I couldn't do the really complicated ones, but still the ones chosen are tied to my christmas history.
Below are the ornaments/ decorations I was inspired by, and my ORNAMENT themed nails!


For the base color I used Sally Hansen - spark (#06) which is a really beautiful color. the polish itself it a greenish blue (which can only be noticed if smeared), but appears as a solid micro micro micro glitter iridecent blue to purple effect. Maybe its because this polish is not so new, but it was a one coater! I get tired of using the typical christmas palette so I thought a deep blue purple would make the ornaments and decoration pop out as well as be refreshing to use.


Next for all the fingers I took my Nail Star - silver (#114) and made a 1/2 moon of tinsel/branch for the ornaments to hand on. Then using my Ruby Kissed - french white  I dotted some circles on the silver.
Also after each ornament was finished i filled in the negative space with more dots and snowflake/stars in the same silver. Finally gold nail art beads were placed on top of each ornament to act as a ornament hook.


Starting on the thumb: for the ornament with the bow I used Love & Beauty - gold, then put gold bar glitter on top the O.P.I. because the ornament i was inspired by is a large glass orb with a gold netting around it. For the bow I used turquoise nail art beads to tie in some of the same color of one of the angels. The peppermint swirl ornament was inspired by this really beautiful Waterford Crystal peppermint ornament, and is kind of opal and metallic looking. To capture that shine I used Ruby Kisses - french white  and Kiss - red, and then added micro glitter on top of the red for the shine.


The index and ring finger with the angels were done the same so i'll do them together... So first I used round and (american :) ) football shaped cabochons in magenta, pink and aquamarine, the wings i used Kiss - white striper with Kiss - gold  glitter striper.  For the bottom of the angels and the center between the head and body I used magenta, light pink and light blue nail art beads. These angels were inspired by ornaments my grandmother gave to my mom. They are Swarovski crystal and are colored according to my families birthstone, my mom feb- amethyst, my sister oct - rose quartz and mine and my dads- march - aquamarine. These are my favorite nails because i think they were most successful.


The stars were done similar to the wings, I used A base of Kiss - white striper, Kiss - gold glitter striper then added some yellow micro glitter. Finally for the heard I used Nail Star - silver (#114), then covered it with red micro glitter.  Then 3 thick coats of Seche VITE -  quick dry top coat.


Tomorrows theme is PRESENTS!

For more ORNAMENT themed nails check out these ladies blogs:
Thanx for stopping by :)

❄
❇❅❆✺❃❉❄❇❅❆✺❃❉❄❇❅❆✺❃❉❄❇❅❆✺❃❉❄❇❅❆✺❃❉

December 06, 2011

24 days of XMAS Challenge : Day 6

❄❇❅❆✺❃❉❄❇❅❆✺❃❉❄❇❅❆✺❃❉❄❇❅❆✺❃❉❄❇❅❆✺❃❉
I cannot believe it is already day 6 of the 24 day challenge!  Christmas is almost here!
I thought i would get a jump start on this days challenge, so i bring to you my PENGUIN themed nails! For my inspiration I took a look at a book from my childhood, Mr. Poppers Penguins!


I'm pretty exhausted now so i'll just get right to it.
I used Sally Hansen - shell we dance (#160) for the base color. I then made half moons at the tops of my nails using Love & beauty - royal 2 coats. It was a little to bright and I was looking for a softer ore ice like effect so i put 1 coat of O.P.I. - kyoto pearl! it was the most beautiful thing, i almost stopped right there! 
For the penguins and Mr. Popper I used Kiss - white striper, Kiss - black striper, and Nail Star - orange. It was important that Mr. P and the penguins shared the same 3 colors like the book,  although I used orange in place of the red.  I then mad a line at the top of the blue semi circle using Nail Star - metallic blue, which is the same blue i used to illustrate the feathers, as seen on the cover of the book. 
For the Final touches I used the thing i love most and have greatly missed over the last several designs.. NAIL ART BEADS! I placed 20+ on each nail to create a sort of polka dot effect. The beads I used were clear which enhanced the design by reflecting the light as well as the paint beneath. Then finally 2 thick coats of Seche Vite - quick dry top coat to secure the beads. It really just glows! I really had a lot of fun doing this design and i look forward to Day 7 : Gingerbread Men!

To see more penguin inspired nail art check out the following blogs!
❅ nails and stuff ❃ obsessed with glitter ❉ Polish, Oh My! ❇ paint that nail ❄ red hair and black nail polish ✺ Ruby's Nails ❅ finger painted ❃ My Polish Stash ❉ Me, Myself and Nail Polish ❇  KK Nails ❄ My Wet Nails ✺ Life with Salpi ❅ The only way is Nails! ❃

Thanx for stopping by :)

❄
❇❅❆✺❃❉❄❇❅❆✺❃❉❄❇❅❆✺❃❉❄❇❅❆✺❃❉❄❇❅❆✺❃❉

December 02, 2011

24 days of XMAS Challenge : Day 2

❄❇❅❆✺❃❉❄❇❅❆✺❃❉❄❇❅❆✺❃❉❄❇❅❆✺❃❉❄❇❅❆✺❃❉
hellooooo all, here is my SNOWFLAKE nail design!!! (idky but this challenge puts me in a really good mood!) For todays design i wanted to incorporate a few things: [1] snowflakes (of course!) but especially that no two snowflakes are alike! [2] a color fade to emphasize a sky changing from day to night, and [3] a VGAP to create movement! I also really LOVE the VGAP (its so sexy, right?!)


for the base (after the OPI- natural base) I put one sheer layer of Sally Hansen - shell we dance? (#160), for the blue color fade sections, (which are hard to see in some of the pictures, sorry!)  starting at the base I used Milani - art deco blue (#95), Love & Beauty - indigo, Love & Beauty - royal,  and finally O.P.I. - austin-tacious turquoise at the tip of the nail. For the snowflakes I used Kiss - white striper, and last i used NYC - starry silver glitter (#105) just in center over the gap. Then i topped it off with Seche VITE - quick dry top coat.

For those of you who are doing this challenge, i hope you are having as much fun as i am! :) and i can't wait to see how the rest of the challenge looks!

Also, be sure to check out the rest of the ladies who are getting their nails into the holiday spirit!

thanx for stopping by :)

❄
❇❅❆✺❃❉❄❇❅❆✺❃❉❄❇❅❆✺❃❉❄❇❅❆✺❃❉❄❇❅❆✺❃❉

Ps: my blog is working again! yayy! :)