Showing posts with label LOVEandBEAUTY. Show all posts

September 06, 2012

Folk'n' Fall

Folk art inspired halloween + fall nails!
Ombre V, Stripes, small hexagonal glitter, and jewel cabochons


what i used:
O.P.I. - palm springs delight + Love & Beauty - orange for the ombre base
Kiss (striper) - neon orange +  Kiss (striper) - bronze for the "V"
Sinful Color (striper) - bad chick + Kiss (striper) - black
Orange metallic hexagonal glitter + red and black jewel cabochons.

May 03, 2012

purple panel ikat

purple nails ready for spring!


What I used:
O.P.I. - natural nail strengthener
O.P.I. - natural nail base coat
Love & Beauty - lavender
Love & Beauty - sheer purple glitter
Nail Star - white striper (108)
Nail Star  - wine striper
Nail Star  - black striper (109)
Kiss - soft purple striper
Kiss - bikini pink striper
10 PNL - perfectly clear (401)


and of course my nail design wouldn't feel complete without embellishments!
so i added small soft purple rhinestones at the top and base of my nail design and soft purple nail art beads in a random pattern on my thumb and ring finger for statement nails!


February 04, 2012

anti-vday

nails for a (hypothetical) broken heart


Love & Beauty - lime, O.P.I. - who the shrek are you?, Layla Magneffect - velvet groove, Ruby Kisses - french white, Revlon - gold coin (#925),  pink and magenta nail art beads and purple rhinestone cabochons. Topped off with Seche Vite -  fast dry top coat.

January 29, 2012

Robert Cavalli inspired nails

 Got more baggage... inspired by Roberto Cavalli bag from the spring 2012 collection


base color 3 coats O.P.I. - kyoto pearl, Nail Star - black for the stripes and flower outline.
Nail Star - white for the base color of the flowers, and Love & Beauty - royal, L.A. girl F.L.A.R.E. and Love & Beauty - lavender. I finished the design off with Seche Vite - dry fast top coat.

January 25, 2012

pink + purple ombre layered!

As i said i'm really into the layered look lately...


First the ombre: I applied two coats of American Apparel - coney island which is an awesome opaque baby pink. I then applied one layer of Sally Hansen Diamond Strength - pink promise (#06) which is a tinted baby pink sheer micro glitter, and looks awesome over pinks and other warm colors.  Next i used Love & Beauty - lavendar, Kiss - soft purple striper and O.P.I. - funky dunky to finish the pink to purple ombre.

The layered design was created using Kiss - red wine (striper)  for the outline. I then filled in random sections of the design using Nail Star -  metallic opaque silver, and Kiss - gold glitter striper.
Seche VITE - fast drying top coat .... end.

January 12, 2012

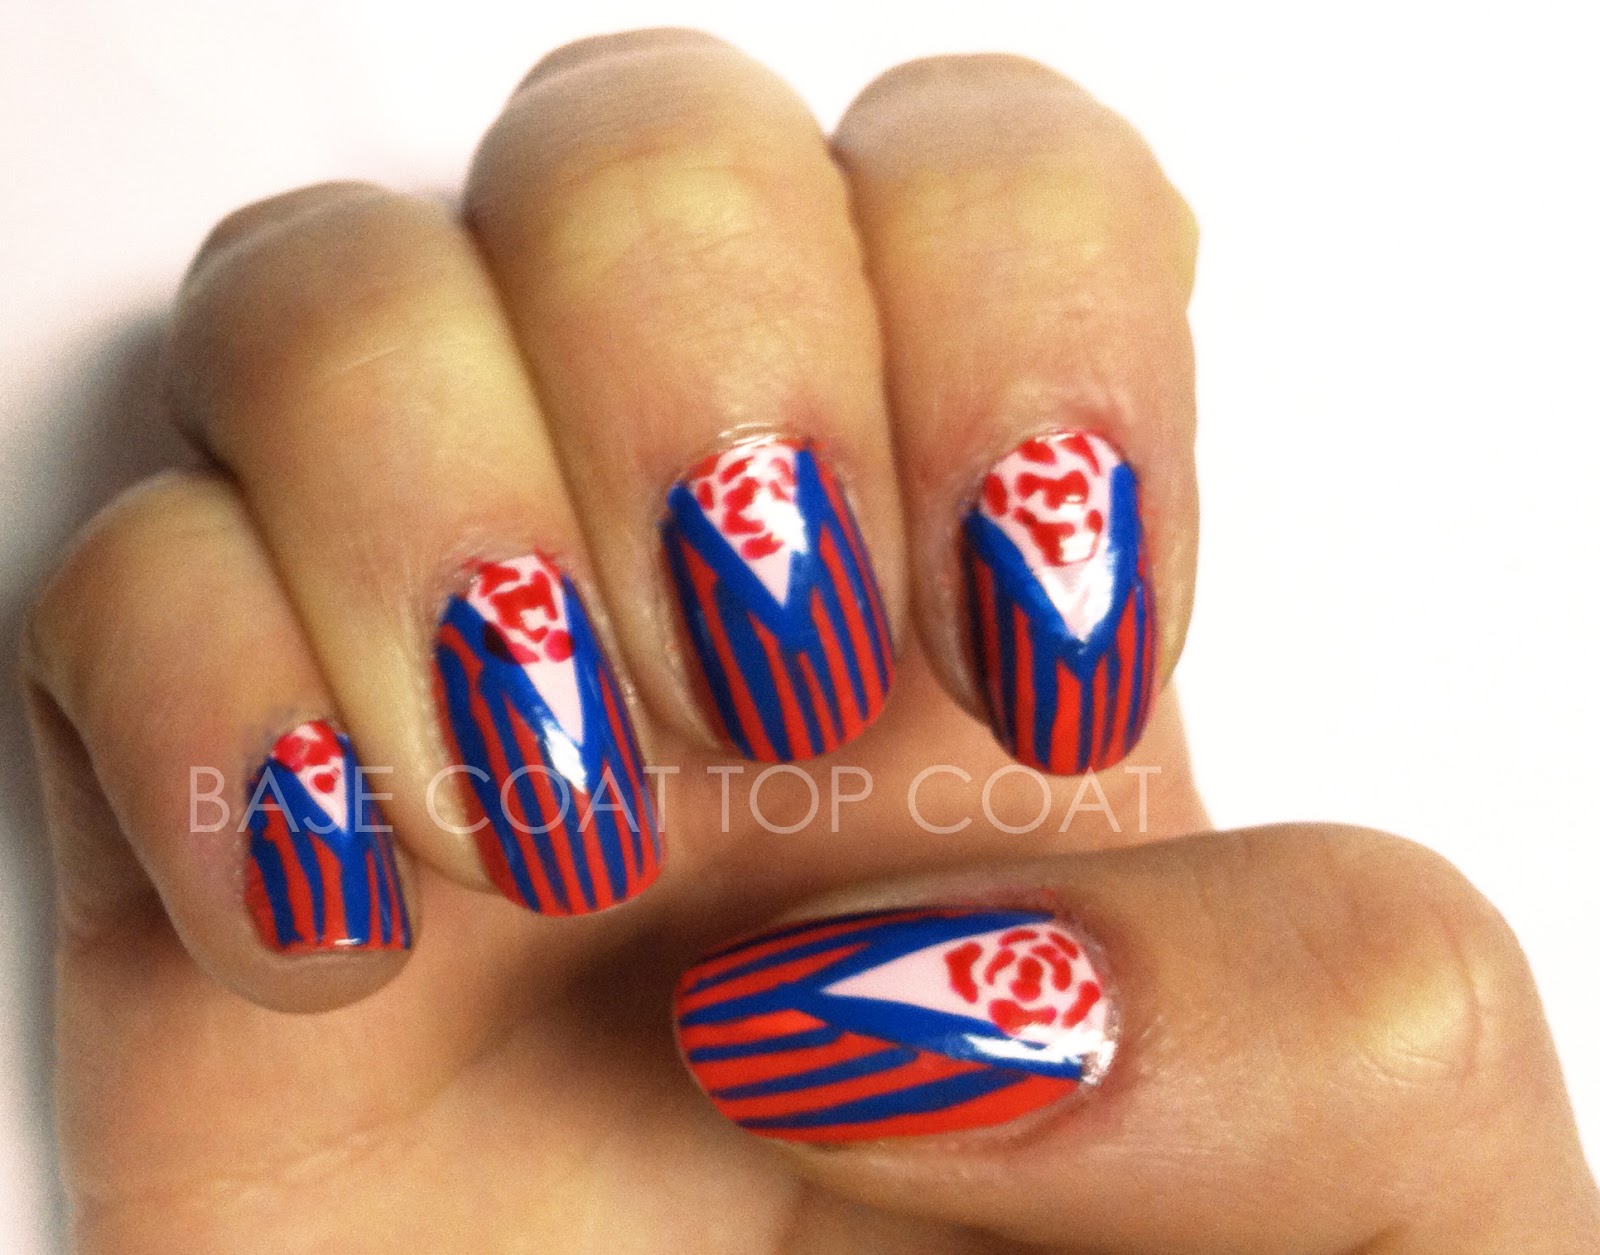
stripe suit

These nails were kind of a random thought. I knew i wanted to  have a pink v-gap with a flower inside, but the blue was chosen soley because red and blue are colors i rarely use together.  I decided that i would use the blue to subdue the intense coral color. I used the blue to outline the Vgap and then added vertical stripes over the coral which from a distance, makes it appear like a color fade from blue to purple to coral. Unfortunately the highlights of the nails are seriously distracting, sorry! and The baby pink triangle was chosen to offset the rest of the design and enhance the directionality of the nail through contrast in color.


The reddish color is Love & Beauty - coral, 3 coats. The baby pink vgap was done using American Apparel - coney island 1 coat. The blue stripes and outline was done using Kiss - blue striper,  and the rose is Nail Star - red.


kelly

December 31, 2011

BLING BLAO!

I LOVE BEDAZZLING!

These are my NEW YEARS EVE NAIL$$$! I wanted to bling out my nails, one, because of it being a night of celebration and two, because i'll either be wearing a LBD or something sequined... decisions, decisions. :) Just like I find it difficult to NOT have crazy embellished and busy nails, I also prefer to have two different (or similar in theme, but not in image or design) designs on either hand. The left hand is more simple, it uses more stones, and was inspired by new age, ICY bling. While my right hand has a more antiquated feel, both in color and the mass amount of nail art beads creating a filigree effect.
Even though i have my BFA in jewelry and metalsmithing I really don't wear a lot of jewelry... So i typically leave it to my nails to bring in that flash... and this manicure delivers!


On my left hand (gold) I used O.P.I. - bling dynasty, 3 coats, and on the right hand I used Love & Beauty - coral, 2-3 coats,with a ring around the nails edge using Kiss - gold glitter striper. I then embellished with gold nail art beads which created filigree and "settings" for my white rhinestone cabochons. I then used 2-3 really thick layers of Seche VITE - fast dry top coat because I'll be busy all day tomorrow with my NYE so I had to do my nails the night before and its important that my nails last the night!

I hope you all have a fantastic NEW YEARS EVE and DAY!!!

December 22, 2011

24 days of XMAS Challenge : Day 21


My internet connection was knocked out by rain last night, and I'm just now getting it back... so without further delay, here are my REINDEER/RUDOLPH themed nails (day 21 of the 24 days of xmas challenge!)


I took a sort of morbid/humored approach to this design being that I did normal reindeer the day before. I also have set a goal for myself for this challenge; to try and make my nails have as much variety as possible by pushing alternative christmas imagery and typical christmas color palettes. 


As you can see I illustrated 3 reindeer skulls (one of them being Rudolph) and two holly-across-bones (skull and crossbones... get it? lol, maybe?!) 
I decided that a softer, feminine color would detract from the morbid imagery, and that the hint of metallic luster would make it feel less flat.
Unfortunately when the internet went out I decided in the meantime I would paint some presents I am making and ended up getting some acrylic paint stuck to my nails and sort made it a little funky in places  :( but hopefully it isn't too distracting. Enjoy!


For the base color I used Love & Beauty - Lavender 1 coat, and to add a nice metallic shine to it, I added Sinful Colors - out of this world (#842), which is a nice consistent sheer micro micro micro glitter.
I wanted to create my own warm grey, but after putting on my top coat the purple really came through!


For the rest of the design I used acrylic paint, and circular and almond shaped rhinestone cabochons for the holly. I then finished it off with my trusty Seche Vite - quick dry top coat.


Todays theme which I will be posting later today is EL/F/VES so stay tuned!


To see more of RUDOLF and the other REINDEER check out these ladies blogs:

December 18, 2011

24 days of XMAS Challenge : Day 17


Hello hello hello. 

sorry this is a late post. These are my nails from yesterday, I did these then i painted my moms nails for a christmas party and so I became lazy... SO, NOW...here is day 17 of the 24 day challenge! The theme was TINSEL!
I wanted to keep this simple (again) so i did a nouveau french! I incorporated real tinsel, beads and tinsel like glitter polish!


The holo bar glitter tinsel-like base was done using Love & Beauty - black/silver, 3 coats. The one thing i dislike about Love & Beauty nail polish is the naming issue. It's an issue because they name all their colors the same... i.e. al greens are green all reds are reds. RARELY do they name the actual color like lavender or mint, but they seriously need to be a little more creative, a little more descriptive or at the vary least put a freakin' number! For the sake of better description lets just call it black/ holo tinsel! jeeeze :)

ANYWAYS.... next i put a single layer of Sally Hansen X - in the spotlight (#35) which is a clear nail polish with slightly larger and less tinsel per coat, just to add a little size variation.

For the embellishment I used a single strip of real tinsel (from the little bundle in my hand) on the tips of my nails to make it a "french".  Finally i added silver nail art beads in a windowed arrangement to accentuate the silver strip and give it a little more flare.

i'll be posting todays theme a little later, which is STOCKINGS!

want more TINSEL? check out these ladies blogs:
Thanx for stopping by :)


December 16, 2011

24 days of XMAS Challenge : Day 16


Today's theme (day 16) for the 24 day's of christmas challenge is LIGHTS!
I decided to go a different route for lights and instead use candle lights as my inspiration. One of my favorite things about the days leading up to the holidays is the candles my mom puts out. They smell so festive and add create an aroma for christmas that is just AMAZING. She also puts candle - lights (with bulbs) in all the windows and when outside it looks so pretty! Now although i didn't use any traditional christmas colors I think that the nails are warm and bright. I've also been interested in using alternative christmas colors because i got tired of using red and green all the time.


For the base color I used Love & Beauty - grey (with gold shimmer)  2 coats
For the candle LIGHT i first used Kiss - yellow striper  then Kiss - orange striper  on top of that
Next I used Nail Star - copper shimmer, and for the  "light" around the flame I first had to put Kiss - white striper so that when i put a layer of Kiss - orange striper  it would really POP!
For the candle I used Kiss - White striper, and for the dripping wax shadow (which is kind of hard to see) I used Nail Star - silver shimmer (#114) For the wick I used  Kiss - black , For the flame I first put down Kiss - white striper, then Kiss - yellow striper, and Kiss - orange striper. Finally I put a gold cabochon at the base of the flame for that extra shine! Then to fill up some of the negative space i used Kiss - orange striper  in a radial pattern around the design.

tomorrow is TINSEL time!

want more LIGHTS? check out these ladies blogs:
Thanx for stopping by :)


December 14, 2011

24 days of XMAS Challenge : Day 14


few days ago my parents, my boyfriend and I decorated the christmas tree! As I unwrapped the ornaments I was flooded with memories. Memories of being a kid and LOVING how some said my name, some i made, some that were my grandmothers, and some that have been on the tree for as long as I can remember. It was nice to see the ornaments that i remember from my youth, as well as a few new ones that I decided for todays challenge, with the theme ORNAMENTS I would look at and recreate some of the ornaments from the tree! Now because my nails are not as big as i want, and my design included other elements I couldn't do the really complicated ones, but still the ones chosen are tied to my christmas history.
Below are the ornaments/ decorations I was inspired by, and my ORNAMENT themed nails!


For the base color I used Sally Hansen - spark (#06) which is a really beautiful color. the polish itself it a greenish blue (which can only be noticed if smeared), but appears as a solid micro micro micro glitter iridecent blue to purple effect. Maybe its because this polish is not so new, but it was a one coater! I get tired of using the typical christmas palette so I thought a deep blue purple would make the ornaments and decoration pop out as well as be refreshing to use.


Next for all the fingers I took my Nail Star - silver (#114) and made a 1/2 moon of tinsel/branch for the ornaments to hand on. Then using my Ruby Kissed - french white  I dotted some circles on the silver.
Also after each ornament was finished i filled in the negative space with more dots and snowflake/stars in the same silver. Finally gold nail art beads were placed on top of each ornament to act as a ornament hook.


Starting on the thumb: for the ornament with the bow I used Love & Beauty - gold, then put gold bar glitter on top the O.P.I. because the ornament i was inspired by is a large glass orb with a gold netting around it. For the bow I used turquoise nail art beads to tie in some of the same color of one of the angels. The peppermint swirl ornament was inspired by this really beautiful Waterford Crystal peppermint ornament, and is kind of opal and metallic looking. To capture that shine I used Ruby Kisses - french white  and Kiss - red, and then added micro glitter on top of the red for the shine.


The index and ring finger with the angels were done the same so i'll do them together... So first I used round and (american :) ) football shaped cabochons in magenta, pink and aquamarine, the wings i used Kiss - white striper with Kiss - gold  glitter striper.  For the bottom of the angels and the center between the head and body I used magenta, light pink and light blue nail art beads. These angels were inspired by ornaments my grandmother gave to my mom. They are Swarovski crystal and are colored according to my families birthstone, my mom feb- amethyst, my sister oct - rose quartz and mine and my dads- march - aquamarine. These are my favorite nails because i think they were most successful.


The stars were done similar to the wings, I used A base of Kiss - white striper, Kiss - gold glitter striper then added some yellow micro glitter. Finally for the heard I used Nail Star - silver (#114), then covered it with red micro glitter.  Then 3 thick coats of Seche VITE -  quick dry top coat.


Tomorrows theme is PRESENTS!

For more ORNAMENT themed nails check out these ladies blogs:
Thanx for stopping by :)

24 days of XMAS Challenge : Day 13

I don't know why but i've gotten into this terrible habit of posting my nails in the wee hours of the morning despite my doing them early in the day, except last night i went to post them around midnight (not too late) and my internet crapped out before i could finish writing this post! >:( ANYWAYS here are my christmas tree inspired nails. I decided to avoid doing an actual christmas tree because tomorrow is ornaments and i may or may not do something with that. So instead I went for a two color, christmas sweater pattern. The thumb and ring finger are supposed to look like more christmas trees in the background, but it kind of just looks like mountains, which I am okay with too.


So first I painted all but one nail using Love & Beauty - mint and one nail with L.A. Girl Flare - hunter green. Next i figured out which of the mint nails I wanted as the "tree farm/mountains"
After that it just took A LOT of patience to get the straight lines. 
Next I used to different sized gold rhinestone cabochons, the taller trees with the larger, and the smaller with ...the smaller, in place of the stars. 
SECHE VITE!

Anyways here is my CHRISTMAS TREE DESIGN! stay tuned because tomorrows theme of the 24 day x-mas challenge is ORNAMENTS!

To see more CHRISTMAS TREE nails check out these ladies blogs:
Thanx for stopping by :)

December 13, 2011

24 days of XMAS Challenge : Day 12


Hey everyone! So i finished these a few hours ago but had some things to do. so here they are now, my HOLLY themed nails.. day 12 of the 24 days of xmas challenge! What I wanted for this challenge, was have a sort wallpaper effect. I used muted red and green and a white to add to the wallpaper feel,  with interchangeable white, red, silver and gold for the holly, and as you can see a gestural as opposed to tight holly print. And decided to add to it even further and making it a patterned/embellished gold tip french. 
I also included a picture of the nail plate i made which i used to figure out which colors to use


The base colors I used were Ruby Kisses - french white, Love & Beauty - mint and American Apparel - coney island. 
The holly on the white nail i used Kiss - gold glitter striper,  and Nail Star - red opaque, On the mint nail I used Nail Star - opaque silver (#114) Nail Star - red, and for the pink i used Nail Star - white 108 and Nail Star - opaque red again. 
Next I added a line of auburn nail art beads, and then filled in the space between the nail art beads to the top of my nail with Kiss - gold glitter striper... Seche Vite

If you'd like to know which colors i used for a specific nail on the holly wheel, then let me know!

Stay tuned for tomorrows nail art themed CHRISTMAS TREES!

To see a tutorial for this design visit the TUTORIAL PAGE.

More boughs of HOLLY nails can be seen HERE:
Thanx for stopping by :)

December 07, 2011

24 days of XMAS Challenge : Day 7


GingerbreadMEN, that was the challenge for day 7
Originally I didn't want to do actual gingerbread men, i was looking more at gingerbread houses for inspiration, but i felt my design was missing something....
What I did was have a gingerbread background, and a ring of icing with red, yellow, orange, green and purple gumdrops.... this is the point at which the design felt empty.
The icing motifs included in the gum drop and icing rings are : gingerbread men,  a gingerbread house, spiral and heart! I wanted them to look like they were draw in icing and add to the already playful palette to give it that.... child like fancy? lol


The base color I used was Love & Beauty - cocoa (how appropriate for holiday related foods) i seriously can't say it enough... these nail polishes are SWEET, one coaters nice colors... more more more!
Next.. because alas i still have no dotting tool I used the end of a paint brush and made connecting dots in a ring around my nail, not too close to the edges though, using Ruby Kisses - french white.
For the colors i used Nail star - red, Nail star -  glittery orange,  Nail star - lime green, Nail star - dark purple, & Kiss - gold glitter stripper, and dotted the colors... gumdrops... randomly in the center of white... like gumdrops stuck on with icing. 
To fill the empty space of the design I used Ruby Kisses - french white for the drawings.
need i say it.... Seche Vite - quick dry top coat!

and there you have it, ginger things (title, maybe? ) Tomorrow is CANDY CANES

hungry for more gingerbread? check out these blogs!
Thanx for stopping by :)